On This Page
OAuth 2.0 Partner Implementation Guide
This section describes how to use this guide and where to find further
information.
- Audience and Purpose
- This document is for technology partners who want to register their OAuth application withCybersource. Merchants can then delegate access to a technology partner to take actions on their behalf without sharing security keys. Actions can include accessing customer data and processing transactions.
- Conventions
- This special statement is used in this document:IMPORTANTAnImportantstatement contains information essential to successfully completing a task or learning a concept.
- Related Documentation
- Visit theCybersourcedocumentation hub to find additional processor-specific versions of this guide and additional technical documentation.
- Customer Support
- For support information about any service, visit the Support Center:
Recent Revisions to This Document
26.07.02
This guide has been reorganized to support the new OAuth 2.0 integration methods.
26.04.02
Corrected the supported DigitCert CAs. The same CA can be used for both production
and test environments. See Enable Mutual Authentication.
26.04.01
Added list of supported DigiCert CAs for the test environment. See Enable Mutual Authentication.
Added additional information about the deprecated DigiCert CAs and how to know if you
are affected by the no longer supported DigiCert CAs. See Enable Mutual Authentication.
25.11.01
Added new section for how to set up OAuth 2.0. See How to Set Up OAuth 2.0.
Added support for new DigiCert CAs. Removed support for previous DigiCert CAs. See
Enable Mutual Authentication.
25.05.02
This revision contains only editorial changes and no technical updates.
25.05.01
Updated the list of valid certificates for mutual authentication. See Enable Mutual Authentication.
25.01.02
Updated the supported certificate authorities. See Enable Mutual Authentication.
25.01.01
Updated the server-to-server certificate to include supported certificate
authorities. See How to Set Up OAuth 2.0 and Enable Mutual Authentication.
Visa Platform Connect: Specifications and Conditions for
Resellers/Partners
The following are specifications and conditions that apply to a Reseller/Partner enabling
its merchants through
Cybersource for
. Failure to meet any of the specifications and conditions below is
subject to the liability provisions and indemnification obligations under
Reseller/Partner’s contract with Visa/Cybersource.Visa Platform Connect
(“VPC”)
processing- Before boarding merchants for payment processing on a VPC acquirer’s connection, Reseller/Partner and the VPC acquirer must have a contract or other legal agreement that permits Reseller/Partner to enable its merchants to process payments with the acquirer through the dedicated VPC connection and/or traditional connection with such VPC acquirer.
- Reseller/Partner is responsible for boarding and enabling its merchants in accordance with the terms of the contract or other legal agreement with the relevant VPC acquirer.
- Reseller/Partner acknowledges and agrees that all considerations and fees associated with chargebacks, interchange downgrades, settlement issues, funding delays, and other processing related activities are strictly between Reseller and the relevant VPC acquirer.
- Reseller/Partner acknowledges and agrees that the relevant VPC acquirer is responsible for payment processing issues, including but not limited to, transaction declines by network/issuer, decline rates, and interchange qualification, as may be agreed to or outlined in the contract or other legal agreement between Reseller/Partner and such VPC acquirer.
DISCLAIMER: NEITHER VISA NOR CYBERSOURCE WILL BE RESPONSIBLE OR LIABLE FOR ANY ERRORS OR
OMISSIONS BY THE
Visa Platform Connect
ACQUIRER IN PROCESSING TRANSACTIONS. NEITHER VISA
NOR CYBERSOURCE WILL BE RESPONSIBLE OR LIABLE FOR RESELLER/PARTNER BOARDING MERCHANTS OR
ENABLING MERCHANT PROCESSING IN VIOLATION OF THE TERMS AND CONDITIONS IMPOSED BY THE
RELEVANT Visa Platform Connect
ACQUIRER. Introduction to OAuth 2.0 Integration
OAuth 2.0 is an industry-standard authorization protocol that enables your client to
securely delegate limited access to other clients without exposing sensitive
credentials. Instead of you having to share passwords or API keys, OAuth 2.0 enables
secure token-based authentication between clients for better security and control over
data access. This guide explains the different OAuth 2.0 integration methods available
through
Cybersource
and how to integrate to the best method for your
organization. For the purposes of this guide, a client
can be an application,
platform, system, or AI agent, depending on your organization.
Benefits of OAuth 2.0
OAuth 2.0 replaces direct credential sharing with a secure-token method, which
provides these benefits:
- Enables delegated access for merchants authorizing partner access.
- Supports system-to-system integrations without user interaction.
- Enables controlled access using scopes and tokens.
- Users can revoke access at any time.
Participants
OAuth 2.0 involves these participants working together to grant client access securely:
- Merchant:the resource owner who owns the protected resource and can grant your client access to it.
- The authorization server that authenticates the resource owner and issues access tokens after a successful authorization.CybersourceOAuth API:
- the resource server that hosts the protected resource that you want to access, such as the payments API.CybersourceAPIs:
- Client or Portfolio:The technology partner solution or acquirer platform that requests access to the protected resource on behalf of the resource owner.
Prerequisites
You must create a
Cybersource
Business Center
account to complete the set up tasks described in this
guide. The type of account you create is dependent on your organization type:- Create a Test Account
- Acquirer Partners:To sign up for an account as an acquirer partner who manages a portfolio of merchants, see the Become a partner sign up page on theCybersourcedeveloper center.
- Merchants:To sign up for a sandbox test account, see the Sandbox account sign up page on theCybersourcedeveloper center.
- Technology Partners:To sign up for an account as a technology partner who develops applications for merchants, see the Become a partner sign up page on theCybersourcedeveloper center.
- Set Up REST
- Your system must also be REST-compliant in order for you to send API requests on-behalf-of merchants and other users.Cybersourceuses the REST API to securely communicate with your system. For more information about how to set up your system to use REST, see the Getting Started with REST Developer Guide.
Choose Your Integration Method
Cybersource
offers three OAuth 2.0 integration methods. The method you
integrate to is determined by your organization type and how your client obtains consent
from another party to access their data. Grant Type | Integration Method | Description | Organization type | Example |
|---|---|---|---|---|
Authorization Code Grant | On-Behalf-Of | A merchant or user signs in to the Cybersource Business
Center and grants your client permission to act on their behalf.This
integration method is also known as on-behalf-of, or
OBO. | AI agent enabler | An AI assistant performs payment operations, dispute handling, or
reconciliation on behalf of a consenting merchant, limited to the
permissions that the merchant approves. |
Partner acquirer or partner reseller | A bank portal initiates refunds or views reporting data on behalf of
its merchants. | |||
Technology partner | A SaaS platform accesses payment and reporting APIs on behalf of its
merchants. | |||
Merchant | A merchant grants a trusted client permission to access account data
or perform permitted API operations on the merchant’s behalf. | |||
Authorization Code Grant | OpenID Connect (OIDC) | Your client authenticates users with one of the supported sign-in methods.
| Partner acquirer or partner reseller | A bank platform uses federated login with Cybersource
or coordinates sign-in across multiple merchants. |
Technology partner | A partner portal uses SSO so merchants can sign in with their
Cybersource credentials. | |||
Client Credentials Grant | Machine-to-Machine (M2M) | Your system accesses Cybersource APIs without user sign-in
or merchant consent during the flow.The client and Cybersource authenticate each other before Cybersource issues an access token. | AI agent enabler | An AI coding agent or automated process connects to VAP MCP to
perform reconciliation, reporting, or scheduled payment
operations. |
Merchant | A merchant ERP or reconciliation system accesses payment APIs
securely with OAuth tokens instead of static API keys. | |||
Partner acquirer or partner reseller | An enterprise reporting platform or AI automation system aggregates
data across multiple merchants. | |||
Technology partner | A Remote MCP integration or embedded component calls Cybersource APIs as a system client. |
Acquirer and Merchant: Register for OAuth 2.0
To begin using OAuth 2.0, you must register your application or organization in the
Business Center
.Follow these steps to register your organization for OAuth 2.0 as an acquirer
partner, merchant, or AI agent enabler:
IMPORTANT
Your account must have
OAuth Application Management permissions in order to register for OAuth 2.0 in
order to register.
- Log in to theBusiness Center:
- On the left navigation panel, chooseAccount Management > OAuth Application Management.
- ClickAdd Application.The Add Application page appears.
- In the Authentication Type drop-down menu, choose one of these authentication types:
ADDITIONAL INFORMATION
- OAuth 2.0 (API Access):Use for API authorization access toCybersourceAPIs.
- OpenID Connect (User Sign-In):Used for user authentication and identity, which includes ID token support.
- In the Application Type drop-down menu, choose one of these application types:
ADDITIONAL INFORMATION
- Web Application:Sever-side applications capable of securely storing credentials.
- Mobile Application (for OpenID Connect only):Public client application, such as mobile or native apps.
- Server Integration (for OAuth 2.0 Connect only):Machine-to-machine (M2M) communication without user consent, such as remote MCP or AI agents.
- In the Application information section, enter this information:
- Application name:The name of the application that you are registering.
- Application description:A brief description of the application.
- In the OAuth configuration section, enter the URL to which the user is redirected after granting permissions with auth_code.
- ClickNextwhen done.The Product Configuration page appears.
- Configure your API permissions by choosing whichscopesyour application can access.Scopes determine whichCybersourceAPIs your application can use. Only choose the minimum necessary scopes needed for your organization in order to avoid unnecessary access. This is also known as following the principle of least privilege (PoLP).
- ClickSavewhen done.Yourclient IDandclient secretare generated. These credentials are required for OAuth authentication.IMPORTANTSecurely store these credentials in your system. The client secret displays once and will not be viewable again. If you forget it or it is compromised, you can regenerate a new one any time.
- ClickDoneto return to the Authorized Applications page.
AFTER COMPLETING THE TASK
After registering your platform as an acquirer or your account as a merchant, you
can integrate to one of these OAuth 2.0 methods:
- Authorization Code Grant using On-Behalf-of Integration
- This method is only available to acquirer partners.
- A merchant or user signs in to theBusiness Centerand grants your platform permission to act on their behalf. This is also known ason-behalf-of(OBO).
- To integrate to this method, see Authorization Code Grant.
- Authorization Code Grant Using OpenID Connect Integration
- This method is only available to acquirer partners.
- Your platform authenticates users by redirecting them to aBusiness Centersign-in page. When the user signs in using their account credentials, a federated identity relationship is established withCybersourcethat enables single sign-on (SSO).
- For instructions about how to integrate to this OAuth method, contactCybersourcecustomer support.
- Client Credentials Grant using Machine-to-Machine Integration
- Your system accesses theCybersourceAPIs without a user logging in or merchant consent. Both your system and theCybersourcegateway authenticate each other.
- To integrate to this method, see Client Credentials Grant.
Technology Partner: Register Your OAuth Application
To begin using OAuth 2.0, you must register your application in the
Business Center
.
For additional information about becoming a technology
partner, see the
Getting Started as a Technology Partner
Guide
.IMPORTANT
Before you can begin registering your application, you must have a validated
application to submit for registration.
Follow these steps to register your application for OAuth 2.0 as a technology
partner:
- Log in to theBusiness Center:
- On the left navigation panel, choosePartner Management > Manage Solutions.
ADDITIONAL INFORMATION
The Manage Solutions page appears. - ClickAdd Solution.
- Follow the guided process to enter the required information for onboarding your solution.IMPORTANTDefine theCybersourceproducts that are part of your integration during solution onboarding. You can find the products and services available for integration on the Developer Center API Reference. The solution onboarding flow presents the product scopes that align with the available products and services.
AFTER COMPLETING THE TASK
After you successfully onboard your application, you receive a test partner solution
ID. Your
partner solution ID
is used as your organization ID. This is the
unique identifier for your integration with the platform. Use your partner solution
ID for testing purposes only. Test your integration and provide any requested
details to your Cybersource
solutions team. Your solutions team will
validate your integration and provide you with a production partner solution ID when
you are ready to go live.- Authorization Code Grant using On-Behalf-of Integration
- A merchant or user signs in to theBusiness Centerand grants your application permission to act on their behalf. This is also known ason-behalf-of(OBO).
- To integrate to this method, see Authorization Code Grant.
- Authorization Code Grant Using OpenID Connect Integration
- Your application authenticates users with one of these sign-in methods:
- Your platform authenticates users by redirecting them to aBusiness Centersign-in page. When the user signs in using their account credentials, a federated identity relationship is established withCybersourcethat enables single sign-on (SSO).
- For instructions about how to integrate to this OAuth method, contactCybersourcecustomer support.
- Client Credentials Grant using Machine-to-Machine Integration
- Your system accesses theCybersourceAPIs without a user logging in or merchant consent. Both your system and theCybersourcegateway authenticate each other.
- To integrate to this method, see Client Credentials Grant.
Revoking Authorization Access as a Merchant
As a merchant or user, you can revoke a client’s access at any time after permission
is granted. Revoking access prevents the client from sending API requests on your
behalf. You may need to revoke access if you are no longer using the client or if
you want to change the permissions granted to it. After you revoke permissions, the
client must obtain your authorization access again in order to send API requests on
your behalf.
IMPORTANT
Your merchant account must have OAuth administrative privileges in order to
revoke a client's OAuth permissions. Contact your portfolio administrator
for more information.
As a merchant, follow these steps to revoke an client's authorization access to your
account:
- Log in to theBusiness Center:
- On the left navigation panel, chooseAccount Management > Authorized Applications.The OAuth Applications page appears.
- ClickRevokenext to the corresponding OAuth application that you no longer want processing API requests on your behalf.
Authorization Code Grant
Use the
authorization code grant
when another organization must sign in and grant
consent for your application to access the Cybersource
APIs on their
behalf. Your application can only perform tasks determined by the scopes set by the
consenting organization. To act on-behalf of an organization, your application must
request an access token and then continually request refresh tokens.Available Organization Types
This table lists the different organization types that can use the delegated access
integration and possible business examples for using it.
Available Organization Types | Business Example |
|---|---|
Acquirer or Reseller Partner (Portfolio Manager) | A bank or reseller portal initiates refunds or views
reporting data for merchants. A centralized platform manages access for multiple merchant
businesses. |
AI Agent Enabler | An AI agent performs payment operations, dispute handling, or
reconciliation for consenting merchants. |
Technology Partner (Solution Provider) | A SaaS platform accesses payment or reporting APIs on behalf
of merchants. |
How it Works
These are the tasks that all organizations and applications must complete in order to
successfully use delegated access:
- The merchant accesses your application to begin integrating to it.
- Your application redirects the merchant to theBusiness Centerusing a URL that you configured. For more information, see Obtain Merchant Authorization.
- The merchant logs in and grants your application permission to act on their behalf.
- Cybersourceredirects the merchant to your application using the URL you registered during signup with an authorization code appended to the URL.
- Your application receives the authorization code from the redirect URL.
- Your application uses the authorization code to request an access and refresh token fromCybersource. For more information, see Request Access and Refresh Token.
- Cybersourceresponds with an access and refresh token.
- Your application uses the access token to send API requests toCybersourceon behalf of the merchant. For more information, see Send API Request on Behalf of Merchant.
- Your application uses the refresh token to request a new set of access and refresh tokens when your current access token is about to expire. Request new access and refresh tokens as often as you need to. For more information, see Renew Access and Refresh Token.
Client Authentication Setup
You must setup secure
client authentication
in order for Cybersource
to verify your application when it requests access tokens. When using this
integration method, you must use mutual TLS (mTLS)
client authentication. MTLS
client authentication provides bidirectional authentication between you and Cybersource
. When your application sends an API request, it includes an
authentication certificate. Cybersource
validates the certificate, which
verifies your application's identity, and then issues you an access token and refresh
token.Supported Certificates
Obtain a supported certificate from the DigiCert Certificate Authority (CA). You can
request a certificate from this DigiCert support page:
https://www.digicert.com/contact-us
Obtain one of these supported certificates:
- DigiCert CAs
- X9 Financial PKI – ECC P-256 Root
- X9 Financial PKI – RSA 2048 Root
- X9 Financial PKI – RSA 4096 Root
- Visa CA
- VICA 10 CA
- Cybersourceoffers the free VICA10 CA certificate. It is ideal for testing and is self-managed by the root certificate authority – G2. To request a VICA10 certificate, contact customer support: contact-us.html
Overview of Set Up
Complete these tasks to set up mTLS client authentication:
- Generate a private key in your system.
- Extract a certificate signing request (CSR) from your private key.IMPORTANTThe CSR's common name cannot exceed forty characters.
- Request a certificate from the DigiCert certificate authority (CA). You submit your CSR in this request.For a list of the supported certificates, see theSupported DigiCert Certificatessection below.
- Receive a certificate from DigiCert after your request is validated.
- Submit your certificate in theCybersourceBusiness Center, which generates a P12 certificate for you to download and use in your integration.IMPORTANTSecurely store the P12 certificate and password in your system. Do not share the certificate or its credentials with anyone outside of your administrative team.For instructions about how to submit your certificate, see theSubmit Your Certificate tosection below.Cybersource
To test mTLS client authentication before you request a DigiCert certificate, contact
Cybersource
customer support.Submit Your Certificate
Follow these setups to submit your certificate to
Cybersource
:
[COMING
SOON]Obtain Merchant Authorization
This section describes how to construct the redirect URL that your application uses to
send the merchant to the
Business Center
to grant permissions.Before your application can send API requests on-behalf-of a merchant, the merchant must
grant your application permission to do so. To obtain permission, your application must
redirect the merchant to the
Business Center
. The merchant can then log in to
their account and review the scope of permissions your application is requesting. After
the merchant approves your application to perform the listed permissions, Cybersource
redirects the merchant to your application. The redirect URL that
Cybersource
uses is determined by the URLs you submitted when
registering for OAuth 2.0. Cybersource
also appends the redirect URL
with an authorization code and state status. The authorization codes is necessary to
request an access token. IMPORTANT
Use HTTPS when you redirect merchants to the
Business Center
.IMPORTANT
The merchant must log in to an account with adequate privileges in order to
approve your application's requested permissions. If the merchant is unable to
log in when redirected, the merchant must contact
Cybersource
customer support.Create and Implement a Redirect URL
Follow these steps to construct the URL that your application can use to redirect
merchants to the
Business Center
where they can grant permissions.- Set the host domain for the redirect URL:
- Production:https://businesscenter.cybersource.com/ebc2/
- Test:https://businesscentertest.cybersource.com/ebc2/
- Append the host domain with a question mark (?) to designate the start of the query-string.
- Include these query-parameters with an ampersand (&) after each consecutive parameter. Set the required parameters in the order that they are listed.Required Request ParametersRequest ParameterDescriptionresponse_typeSet tocode.client_idThe client identifier issued byCybersourcewhen you registered your application.Example:client_id=abc123xyzredirect_uriThe URI to which the merchant is redirected to after granting your application authorization in theBusiness Center.Example:redirect_uri=https://app.example.com/callbackstateA value your application generates that is used as CSRF protection. The generated value must be unique and cryptographically random. After the merchant grants your application authorization,Cybersourceredirects the merchant to your application and appends this value to the redirect URL.Example:state=af0ifjsldkjcode_challengeThe PKCE code challenge is a SHA-256 hash of the code verifier, encoded using Base64URL. For more information about generating a code verifier and its code challenge value, see the Generating a Code Verifier and Code Challenge section below.code_challenge_methodSet toS256.IMPORTANTThe recommended fields add additional security when obtaining permissions from the merchant.
- Example: Readable Redirect URL
- This example is formatted in a readable structure and is not intended to be used.
- https://businesscenter.cybersource.com/ebc2/oauth2/authorize? response_type=code& client_id={yourClientId}& code_challenge={codeChallenge}& code_challenge_method=S256& redirect_uri={yourCallbackUrl}& state={state}
- Example: Encoded URL for Implementation
- This example is formatted correctly for implementation.
- https://businesscenter.cybersource.com/ebc2/oauth2/authorize?response_type=code&client_id={yourClientId}&code_challenge={codeChallenge}&code_challenge_method=S256&redirect_uri={yourCallbackUrl}&state={state}
- Set your application to use your constructed URL to redirect merchants who want to grant permissions.
- Cybersourceredirects the merchant back to your application after the merchant completes granting permissions. The URL used to redirect the merchant to your application is the URL you submitted during registration. It includes these response parameters appended to it:your_registered_redirect_URL?code={authorization_code}&state={state}Response ParametersResponse ParameterDescriptioncodeThe authorization code that is used to request access and refresh tokens. It expires ten minutes after being issued. If the code expires, you must request merchant authorization again.stateThe CSRF protection value that you sent in thestateparameter. If this value does not match the value you sent, reject the request.
AFTER COMPLETING THE TASK
After receiving an authorization code, you can now request access tokens. For more
information, see Request Access and Refresh Token.
Error Response Codes
These are possible error responses you can receive from unsuccessful requests. Use
this reference to troubleshoot unsuccessful requests.
HTTP Status | Error Code | Description |
|---|---|---|
400 | http_message_not_readable | The request body can not be parsed. |
400 | invalid_request | The request is malformed, contains invalid syntax, or is missing one or more required parameters. |
400 | invalid_client | Client authentication failed, or the client is not recognized by the authorization server. |
400 | invalid_grant | The authorization code is invalid, expired, previously used, or does not match the redirect URI or client that initiated the authorization request. |
400 | invalid_scope | The requested scope is invalid, unknown, malformed, or not permitted for the client. |
403 | access_denied | The merchant or user denied the authorization request, or the authorization server rejected the request. |
403 | insufficient_scope | The access token does not include the scope required to access the requested resource. |
Generating a Code Verifier and Code Challenge
The
code verifier
is a cryptographically random string that your client
generates. It is uses PKCE to securely identify your redirect URL for merchant
authorization with redirect URL Cybersource
uses. The
code verifier
is a PKCE used to securely link the authorization request to
the token request. Its value is a cryptographic random string that your client
generates. After creating the code verifier, create a code challenge. A code
challenge
is a SHA-256-hash value of the code verifier, which is encoded
using Base64URL. The code challenge is included in the authorization request. When
you request access and refresh tokens, you must include the code verifier to confirm
your client's identity.- To create a code verifier, run one of these code snippets in a terminal:
- Java Example
- import java.security.SecureRandom; import java.util.Base64; SecureRandom sr = new SecureRandom(); byte[] code = new byte[32]; sr.nextBytes(code); String codeVerifier = Base64.getUrlEncoder() .withoutPadding() .encodeToString(code); // Use codeVerifier as the code verifier parameter value.
- JavaScript Example
- // Dependency: Node.js crypto module const crypto = require('crypto'); function base64URLEncode(buffer) { return buffer.toString('base64') .replace(/\+/g, '-') .replace(/\//g, '_') .replace(/=/g, ''); } const code_verifier = base64URLEncode(crypto.randomBytes(32)); // Use code_verifier as the code verifier parameter value.
- Run one of these code snippets and include the code verifier value that you generated in the previous step:
- Java Example
- import java.nio.charset.StandardCharsets; import java.security.MessageDigest; import java.security.SecureRandom; import java.util.Base64; SecureRandom sr = new SecureRandom(); byte[] code = new byte[32]; sr.nextBytes(code); String codeVerifier = Base64.getUrlEncoder() .withoutPadding() .encodeToString(code); byte[] bytes = codeVerifier.getBytes(StandardCharsets.US_ASCII); MessageDigest md = MessageDigest.getInstance("SHA-256"); byte[] digest = md.digest(bytes); String codeChallenge = Base64.getUrlEncoder() .withoutPadding() .encodeToString(digest); // Use codeChallenge as the code challenge parameter value. // Use "S256" as the code challenge method parameter value.
- JavaScript Example
- const crypto = require('crypto'); function base64URLEncode(buffer) { return buffer.toString('base64') .replace(/\+/g, '-') .replace(/\//g, '_') .replace(/=/g, ''); } function sha256(buffer) { return crypto.createHash('sha256').update(buffer).digest(); } const code_verifier = base64URLEncode(crypto.randomBytes(32)); const code_challenge = base64URLEncode(sha256(code_verifier));
- Set thecode_challengeparameter to the generated code challenge value.
- Store the original code verifier value temporarily. You must send the same code verifier in your access token request.IMPORTANTDo not regenerate the code verifier before the token request.
Request Access and Refresh Token
Use the authorization code received in Step 2 to request an access token and a refresh
token. Your OAuth application uses the access token to send API requests on behalf of
the merchant. The access tokens is valid for fifteen minutes. Before it expires, your
application uses the refresh token to continue sending API requests on behalf of the
merchant and to request additional refresh tokens. If the access token expires before
you use the refresh token, you must obtain merchant authorization again.
IMPORTANT
Always use HTTPS to securely send and exchange tokens.
Constructing an Endpoint with Query Parameters
To request an access and refresh token, you must construct an endpoint and append a
query-string to it.
Follow these steps to construct and append the endpoint:
- Set the host domain to this endpoint:
- Production:POSThttps://api.cybersource.com/ebc2/oauth2/authorize
- Test:POSThttps://apitest.cybersource.com/ebc2/oauth2/authorize
- Append the endpoint with a question mark (?) to designate the start of the query-string.
- Include these query-parameters with an ampersand (&) after each consecutive parameter. Set the required parameters in the order that they are listed.Required Query ParametersParameterDescriptiongrant_typeSet toauthorization_code.codeThe authorization code received from the authorization response.For more information about how to obtain an authorization code, see Obtain Merchant Authorization.redirect_uriThe redirect URI that is registered to the OAuth application.client_idThe client ID that is issued during OAuth registration for your application.client_secretThe client secret that is issued during OAuth registration for your application.code_verifierThe code verifier that was created during the authorization request. It is a PKCE verifier.For more information about how to create a code verifier, see the Generate a Code Verifier section in Obtain Merchant Authorization.
- Send the API request using your constructed endpoint with an empty message body.
- Example: Readable Request Example for an Access Token
- This example is formatted in a readable structure and is not intended to be used.
- https://api.cybersource.com/oauth2/v4/token? grant_type=authorization_code &code={authorization_code} &redirect_uri={redirect_uri} &client_id={client_id} &client_secret={client_secret}
- Example: Encoded Request Example for Access Token
- This example is formatted correctly for implementation.
- https://api.cybersource.com/oauth2/v4/token?grant_type=authorization_code&code={authorization_code}&redirect_uri={redirect_uri}&client_id={client_id}&client_secret={client_secret}
- Example: Request Body
- {}
- Cybersourceresponds with an access token in theaccess_tokenfield and a refresh token in therefresh_tokenfield:
- Response Example
- { "access_token": "eyJhbGciOiJSUzI1NiIsInR5cCI6Ikp...", "token_type": "bearer", "refresh_token": "eyJhbGciOiJSUzI1NiIsInR5cCI6IkpXVCJ9...", "expires_in": 900, "refresh_token_expires_in": 2592000, "client_status": "active" }
Response FieldsResponse FieldDescriptionaccess_tokenThe access token used to authenticate API requests. Include this token in theAuthorizationrequest header as a bearer token.client_statusThe status of the client, such asactive.expires_inThe amount of time, in seconds from token creation, that the access token is valid.refresh_token_expires_inThe amount of time, in seconds from token creation, that the refresh token is valid.refresh_tokenThe refresh token used to maintain access after the initial access token expires.token_typeThe type of token that is issued.
AFTER COMPLETING THE TASK
After receiving an access and refresh token, you send API requests on behalf of
merchants. For more information, see Send API Request on Behalf of Merchant.
Error Response Codes
These are possible error responses you can receive from unsuccessful requests. Use
this reference to troubleshoot unsuccessful requests.
HTTP Status | Error Code | Description |
|---|---|---|
400 | invalid_grant | The authorization code is invalid or expired. |
400 | invalid_request | The required request parameter is missing or invalid. |
Send API Request on Behalf of Merchant
After you receive an access token, you can send API requests on-behalf of the
merchant using OAuth 2.0. When you send a request, including the access token in the
Authorization
header as a bearer token.IMPORTANT
Not all
Cybersource
APIs support OAuth 2.0. For
an up-to-date list of the APIs that do support OAuth 2.0, contact customer
support.Sending an OBO Request
To send an API request on-behalf of a merchant, set the
Authorization
header element in the JWT to the access token
value. Format the access token value as a bearer token. For more information about
constructing JWTs, see Construct Messages Using JSON Web
Tokens in the Getting Started with REST Developer Guide
.- Example: JWT Authorization Header Element
- --header 'Authorization: 'Bearer <access_token>' \
- Setto the access token or refresh token value.<access_token>
- Test API Request Example
- curl --request POST \ --url https://api-matest.cybersource.com/pts/v2/payments \ --header 'Authorization: Bearer <access_token>' \ --header 'content-type: application/json' \ --data '{ API_request_message }'
- Production API Request Example
- curl --request POST \ --url https://api-ma.cybersource.com/pts/v2/payments \ --header 'Authorization: Bearer <access_token>' \ --header 'content-type: application/json' \ --data '{ API_request_message }'
IMPORTANT
These request examples only display the OAuth header information. For examples of
the request body, see the REST API
Reference.
Next Steps
Your access token is valid for fifteen minutes. When the access token is about to expire, you
can use the refresh token to request a new access and refresh token. Use the new
access token to continue sending requests on-behalf of the merchant, and it. For
more information about requesting a new access and refresh token, see Renew Access and Refresh Token.
Renew Access and Refresh Token
Use this section to request new access and refresh tokens before your current access
token expires. Request new access and refresh tokens as often as you need to. When
you receive a new set of tokens, the previous tokens become invalid. If your current
access token expires before you can request a new set of tokens, you must obtain
merchant authorization again.
IMPORTANT
Always use HTTPS to securely send and exchange tokens.
Required Request Parameters
Parameter | Description |
|---|---|
client_id | The client ID that is issued during OAuth registration for your
application. |
client_secret | The client secret that is issued during OAuth registration for
your application. |
grant_type | Set to refresh_token . |
refresh_token | Set to the current valid refresh token. |
Example: Retrieving a Refresh Token
Request
POSThttps://api.cybersource.com/oauth2/v4/token Content-Type: application/x-www-form-urlencoded grant_type=refresh_token &refresh_token=eyJraWQiOiI4MGI2ZDJjM2NkZGRkMm... &client_id={client_id} &client_secret={client_secret}
Response to a Successful Request
{
  "access_token": "eyJhbGciOiJSUzI1NiIsInR5cCI6Ikp...",
  "token_type": "bearer",
  "refresh_token": "eyJhbGciOiJSUzI1NiIsInR5cCI6IkpXVCJ9...",
  "expires_in": 900,
  "refresh_token_expires_in": 2592000,
  "client_status": "active"
}
Revoked Authorization Access
A merchant can revoke your application's access at any time using the
Business Center
. When authorization is revoked, all active access and refresh tokens
become invalid, and you must request merchant authorization again to re-establish
permissions. To re-establish permissions, see Obtain Merchant Authorization.IMPORTANT
Your account must have administrative privileges in order to
revoke an OAuth application's permissions.
As a merchant, follow these steps to revoke authorization from an application:
- Log in to theBusiness Center:
- On the left navigation panel, chooseAccount Management > Authorized Applications.The OAuth Applications page appears.
- ClickRevokenext to the corresponding OAuth application that you no longer want processing API requests on your behalf.
Client Credentials Grant
Use the
client credentials grant
OAuth method if you want your application to
access the Cybersource
APIs without requiring a user to log in to the
application or a merchant to grant it permission. This method enables your application
to automatically authenticate as itself using the Cybersource
gateway. This integration method requires your application to request an access token using the
Cybersource
API.IMPORTANT
Do not use this integration method if your application or
platform requires user interaction, such as a user signing into their account or
using a consent screen.
Available Organization Types and Business Purposes
The client credentials grant OAuth method is available for these two different
business purposes:
- Embedded Components:A portfolio manager can embedCybersource-hosted UI modules into their application or platform, such as merchant boarding, Unified Checkout, transaction search, reporting, key management, or webhooks.
- Remote MCP Direct Access:A merchant system or AI agent accessCybersourceAPIs automatically without a user needing to log in and approve permissions.
Client Authentication Setup
You must set up secure client authentication in order for
Cybersource
to
verify your application when it requests access tokens. To set up client authentication,
you must create a P12 certificate, which contains a public and private key. You can then
extract the private key and use it to sign every JWT you construct in order to request
access tokens. Access tokens enable your platform or application to act on-behalf of
merchants. This section describes how to create a P12 certificate and extract its
private key.Step 1A: Create a P12 Certificate
Follow these steps to create a P12 certificate:
- Log in to theBusiness Center:
- On the left navigation panel, choose
 Payment Configuration > Key Management.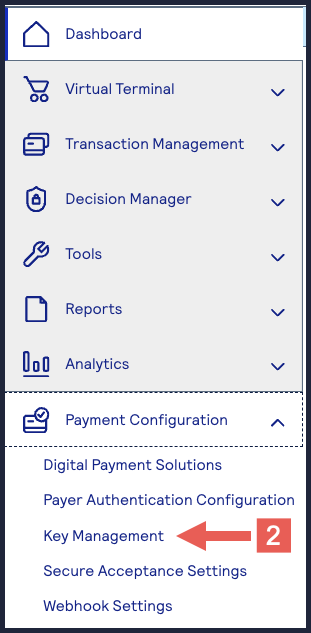
- Click+ Generate keyon the Key Management page.
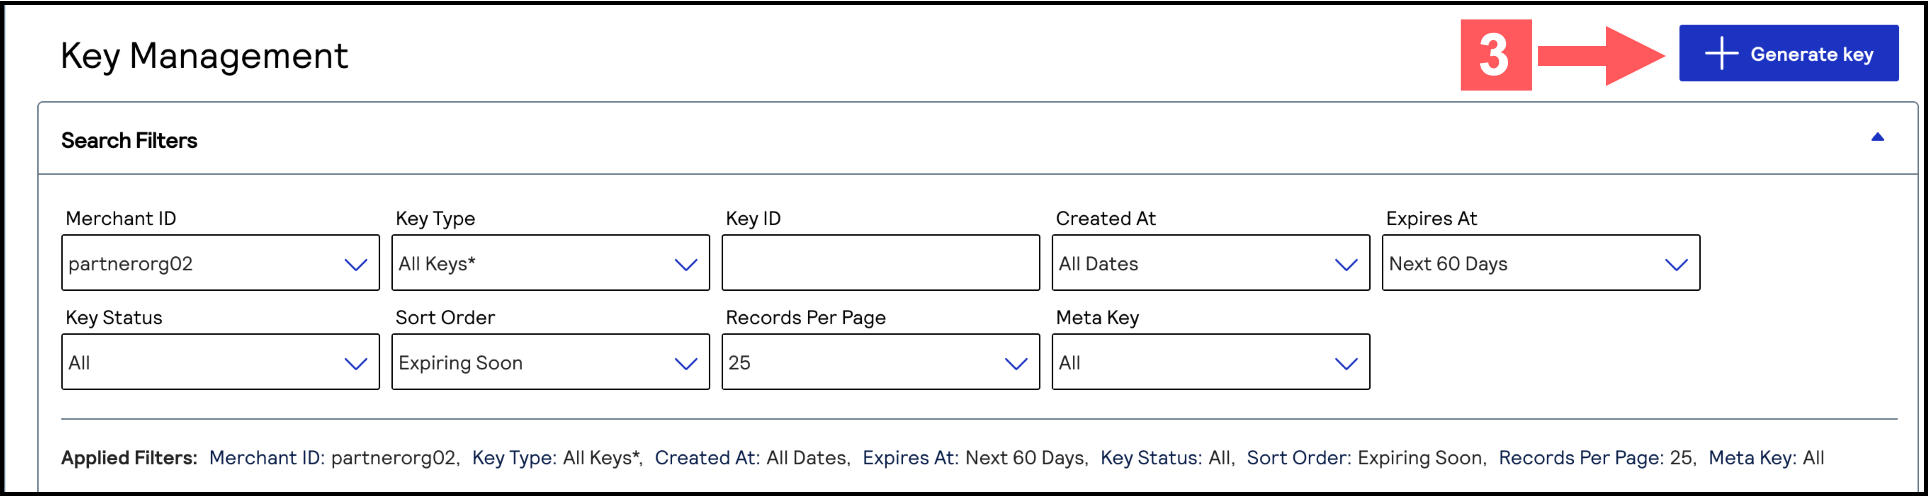
- Under REST APIs, chooseREST – Certificate, and then clickGenerate key.The Key Generation page appears.If you are using aportfolioaccount, the Key options window appears, giving you the choice to create a meta key.For more information about how to create a meta key, see .
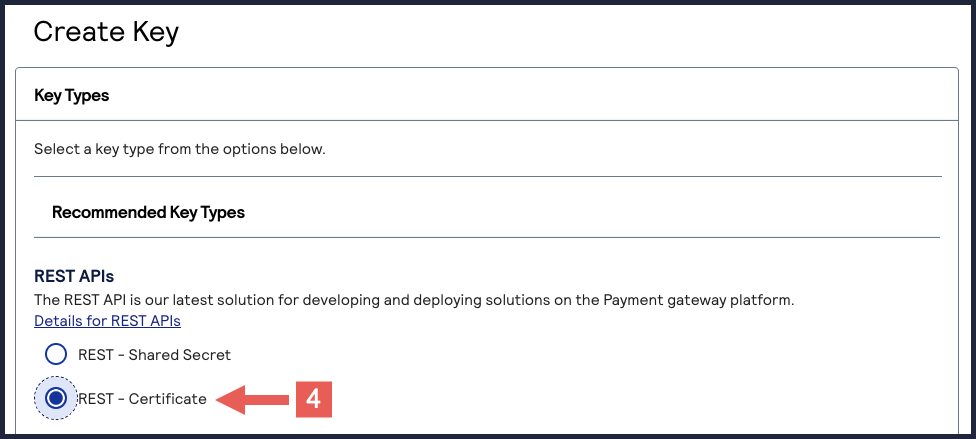 The Confirmation Key Generation window appears.
 - ClickDownload keyafter reviewing the key details.
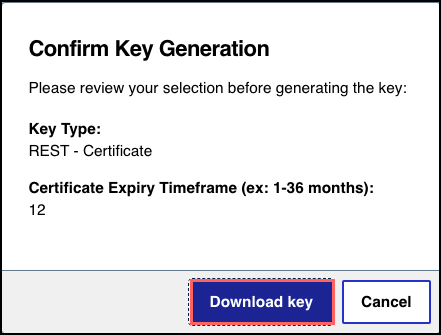 The Key Generation page appears.
 - (Optional) You can set the Certificate Expiry Timeframe field to the number of months you want the key to remain active before it expires. Only whole numbers from 1–36 are accepted. By default, new keys expire after 12 months.
- ClickDownload key
 .
.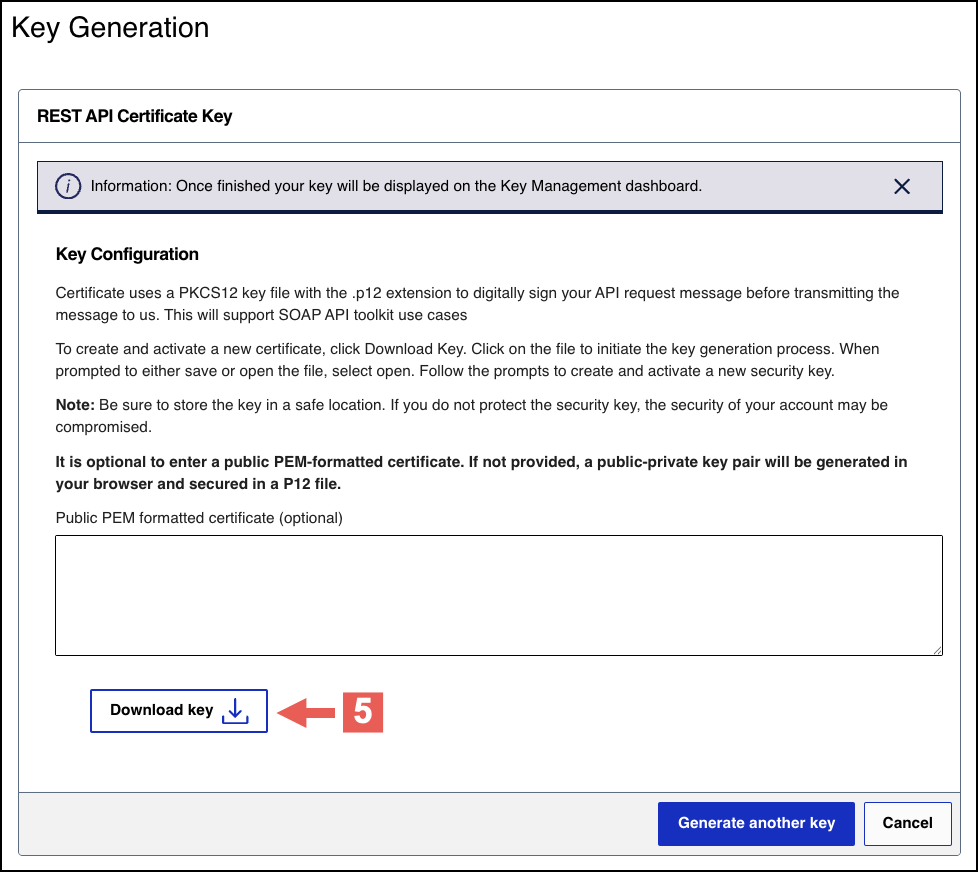
- Create a password for the certificate by entering one into theNew PasswordandConfirm Passwordfields. ClickGenerate key.
 The.p12file downloads to your desktop.If prompted by your system, approve the location to which the key downloads.
Step 1B: Extract the Private Key
When you have your P12 certificate, extract the private key from the certificate. Use
this key to sign your header when sending an API request.
- Prerequisite
- You must have a tool such as OpenSSL installed on your system.
- Extract the Private Key
- Follow these steps to extract the private key using OpenSSL:
- Open the command-line tool and navigate to the directory that contains the P12 certificate.
- Enter this command:openssl pkcs12 -in [certificate name] -nodes -nocerts -out [private key name]
- Enter the password for the certificate.You set this password when you created the P12 certificate in theBusiness Center.
The new certificate is added to the directory with the private key name you supplied in Step 2.
Step 1C: Testing Your Private Key
Follow these steps to verify that your P12 certificate is valid:
- Go to the Developer Center's API Reference page:
- On the left navigation panel, click .
- Under Authentication and Sandbox Credentials, go to the Authentication Type drop-down menu and chooseJSON Web Token.
- Enter your organization ID in theOrganizationfield.
- Enter your Password in thePasswordfield.
- ClickBrowseand upload your p12 certificate from your desktop.
- Click Update Credentials.A confirmation message states that your credentials are successfully updated.A confirmation message states that your credentials are successfully updated.

- Go to the Developer Center's API Reference and navigate toPayments >.POSTProcess a Payment
- ClickSend.
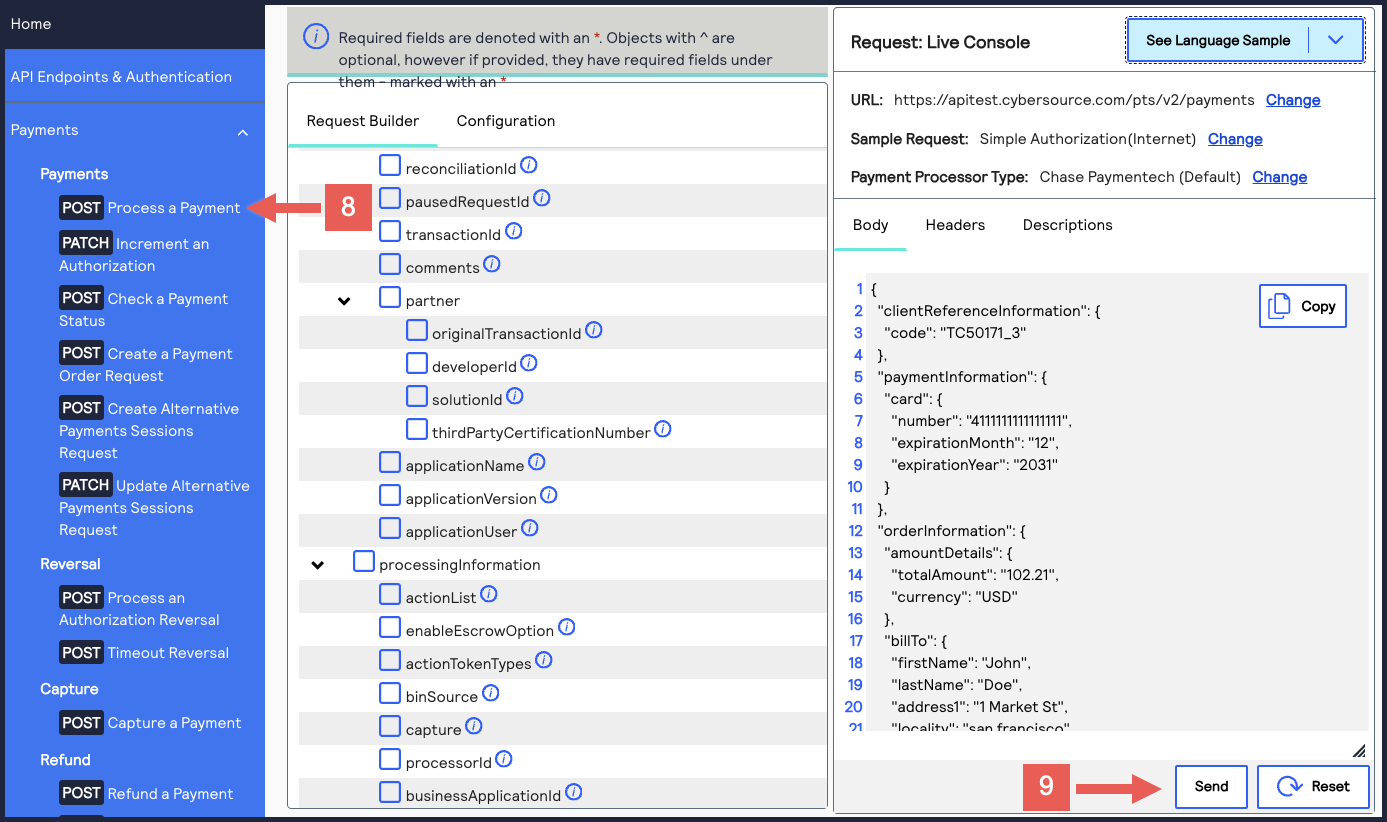 A message confirms that your request was successful with the status code 201.
- Log in to theBusiness Center:
- On the left navigation panel, choose
 Transaction Management > Transactions.
 - Under Search Results, verify that the request ID from the test authorization response is listed in the Request ID column.If the test authorization was successful, a success message is present in the corresponding Applications column.

Create a Client Assertion JWT
Before your system can request permission to act on-behalf of another organization,
your system must create a client assertion. A
client assertion
is a signed
JWT string. Your system must include this string as the
client_assertion
header claim value when it requests an
access and refresh token. Follow these steps to create and sign a client
assertion:- Create a JWT header using these header fields:JWT Header FieldsHeader FieldDescriptionalgThe asymmetric algorithm you use to sign the token header. These algorithms are supported:
- RS256 (default)
- RS384
- RS512
- PS256
- PS384
- PS512
kidThe key ID you use to digitally sign the JWT. It must be registered with the authorizing server. It is the key ID from your P12 certificate.typThe token type. Set toJWT.{ "alg": "RS256", "kid": "your_p12_key_id", "typ": "JWT" } - Construct the JWT payload as a JSON object that contains these required body claims:JWT Body Claim FieldsBody Claim FieldDescriptionaudSet to theCybersourcetoken endpoint. This is the audience of the JWT.expThe expiration time, in Unix epoch seconds. Keep the amount of time the token is valid short.iatThe time at which the token is issued in Unix epoch seconds.issThe issuer of the JWT. Set to one of these possible values:
- For embedded components, set to the partner organization ID.
- For remote MCP direct access, set to the merchant ID.
jtiA unique JWT identifier, such as a UUID. This value must be unique for each request to help prevent replay attacks.scopeThe scopes requested by your application. Set to one of these possible values:- For embedded components, set toboarding.
- For remote MCP direct access, set totransaction_search user_management.
subSubject of the JWT. Set to your application's client ID, which is theclient_idvalue.v-c-merchant-idThe organization or merchant that the access token is created for. Set to one of these possible values:- For embedded components, set to the portfolio organization ID or merchant ID.
- For remote MCP direct access, set to the merchant ID.
v-c-response-mle-kidThe key identifier for message-level encryption (MLE) of the response.{ "iss": "partner_org_id", "sub": "client_id", "aud": "https://api.cybersource.com/oauth2/v4/token", "jti": "f3d0a7c2-5e8b-4c9a-b1d3-e4f5a6b7c8d9", "exp": 1699565100, "iat": 1699564800, "v-c-merchant-id": "Portfolio Org ID or Merchant ID", "scope": "boarding", "v-c-response-mle-kid": "50622d914e4bc08352af3d50bce77120" } - Encode the JWT header and payload using Base64URL.{base64url_encoded_header}{base64url_encoded_payload}
- Create the signing input by combining the encoded header and encoded payload.{base64url_encoded_header}.{base64url_encoded_payload}
- Sign the JWT with the private key from your P12 certificate. Use the P12 certificate that is registered to your OAuth application, platform, or system.This is a conceptual example for how to obtain the encoded signature using Base64URL:sign("{base64url_header}.{base64url_payload}", private_key) = {base64url_encoded_signature}
- Combine the encoded header, payload, and signature with the period character (.) separating each variable. This creates the signed client assertion JWT.{base64url__encoded_header}.{base64url_encoded_payload}.{base64url_encoded_signature}This is a shortened example of what your signed client assertion JWT could look like:eyJhbGciOiJSUzI1NiIsInR5cCI6IkpXVCJ9.eyJpc3MiOiJtZXJjaGFudF9pZCIsInN1YiI6ImNsaWVudF9pZCJ9.XYabc123...
- Set theclient_assertionrequest parameter in the access token request to the JWT string value.client_assertion={signed_jwt}This is an example of the client assertion in a complete access token request:POST https://api.cybersource.com/oauth2/v4/token Content-Type: application/x-www-form-urlencoded grant_type=client_credentials &client_assertion_type=urn:ietf:params:oauth:client-assertion-type:jwt-bearer &client_assertion={signed_jwt}
Request an Access Token
Use this section to enable your system to request an access token from
Cybersource
. An access token enables your system to send API requests
on-behalf of another organization. When your system sends this request, the signed JWT
that contains the request must also contain a client assertion.Endpoints
Production:
POST
https://api.cybersource.com
/oauth2/v4/tokenTest:
POST
https://apitest.cybersource.com
/oauth2/v4/tokenHTTP Header
Set the HTTP header to:
Content-Type:
application/x-www-form-urlencoded
Required Request Parameters
Request Parameter | Description |
|---|---|
grant_type | Set to client_credentials . |
client_assertion_type | Set to
urn:ietf:params:oauth:client-assertion-type:jwt-bearer . |
client_assertion | The signed JWT client assertion. For more information about how to
create a client assertion, see Create a Client Assertion JWT. |
Example: Requesting an Access Token
Endpoint
POSThttps://api.cybersource.com/oauth2/v4/token Content-Type: application/x-www-form-urlencoded grant_type=client_credentials &client_assertion_type=urn:ietf:params:oauth:client-assertion-type:jwt-bearer &client_assertion={signed_jwt}
Response to a Successful Request
{
  "access_token": "eyJh.bGciOi_EXAMPLE_ACCESS_TOKEN_adQssw5c",
  "token_type": "bearer",
  "expires_in": 900,
  "client_status": "active"
}
Response Fields
Parameter | Description |
|---|---|
access_token | The token used to authenticate API requests. Include this
value in the Authorization header as a bearer
token. For more information about how to send an API request
using the access token, see Send a Request On-Behalf of a Merchant. |
client_status | The status of the client, such as
active . |
expires_in | The amount of time an access token is valid after being
issued, in seconds. |
token_type | The type of token issued, such as
bearer . |
Send a Request On-Behalf of a Merchant
After you receive an access token, you can send API requests on-behalf of the
merchant using OAuth 2.0. When you send a request, including the access token in the
Authorization
header as a bearer token.For more information about requesting access tokens, see Request an Access Token.
IMPORTANT
Not all
Cybersource
APIs support OAuth 2.0. For
an up-to-date list of the APIs that do support OAuth 2.0, contact customer
support.Sending an OBO Request
To send an API request on-behalf of a merchant, set the
Authorization
header element in the JWT to the access token
value. Format the access token value as a bearer token. For more information about
constructing JWTs, see Construct Messages Using JSON Web
Tokens in the Getting Started with REST Developer Guide
.- Example: JWT Authorization Header Element
- --header 'Authorization: 'Bearer <access_token>' \
- Setto the access token or refresh token value.<access_token>
- Test API Request Example
- curl --request POST \ --url https://api-matest.cybersource.com/pts/v2/payments \ --header 'Authorization: Bearer <access_token>' \ --header 'content-type: application/json' \ --data '{ API_request_message }'
- Production API Request Example
- curl --request POST \ --url https://api-ma.cybersource.com/pts/v2/payments \ --header 'Authorization: Bearer <access_token>' \ --header 'content-type: application/json' \ --data '{ API_request_message }'
IMPORTANT
These request examples only display the OAuth header information. For examples of
the request body, see the REST API
Reference.
Access Token Expires
Access tokens expire after fifteen minutes. To continue sending API requests on-behalf of
a merchant, request a new access token before the current token expires. When a new
token is issued, the previous token becomes invalid. For more information about
requesting an access token, see Request an Access Token.
Authorization Code Grant Using OpenID Connect
IMPORTANT
The integration instructions for using openID connect is only
available by contacting your
Cybersource
account manager or customer
support.Use the
OpenID Connect
(OIDC) integration method when you need to authenticate and
verify a merchant or customer user who is logging into your platform. When a user
attempts to log in to your platform, they are redirected to the Business Center
to log in to their Cybersource
account. After logging in, Cybersource
sends you an ID token, access token, and refresh token. Use these
credentials to continuously verify the user across your platform when they log in. If
your application is not developed by Cybersource
, the user must grant
consent to being redirected to the Business Center
using an authorization
screen.Available Organization Types
This table lists the different organization types that can use the OIDC integration
method and possible business examples for using it.
Available Organization Types | Business Example |
|---|---|
Acquirer or Reseller Partner (Portfolio Manager) | Merchants sign in using a partner-managed portal. Federated login is used across Cybersource ,
bank platforms, acquired brands, or multiple merchant
environments. |
AI Agent Enabler | When an agent experience includes a user signing in or
identity federation. This is not a common use for this
integration method. |
Merchant | Merchants who want to sign into their platform using their
Cybersource credentials or single
sign-on (SSO). |
Technology Partner (Solution Provider) | Merchants sign in to a partner portal using their Cybersource credentials. |
Integration Support
For instructions about how to integrate to OAuth 2.0 using OIDC, contact your
Cybersource
account manager or customer support.Introduction to OAuth 2.0 Integration

WARNING
The OAuth 2.0 integration method described in this section is no longer supported
for new integrations. This legacy content is maintained only for technology
partners who previously integrated with this method. To integrate to the latest
version of OAuth 2.0, see Introduction to OAuth 2.0 Integration.
OAuth 2.0 enables your
Cybersource
merchants to securely grant your
web-application permission to perform actions on their behalf, such as accessing their
customer data and processing transactions. As a technology partner, you can integrate
OAuth 2.0 into your web-application through Cybersource
. When your
integration is complete, Cybersource
authenticates merchants for you,
ensuring that your web-application only performs actions authorized by the merchants.
This authentication method securely connects your web-application to the merchant
account without the need to receive or store sensitive merchant credentials in your
system. This guide explains how you, a technology partner, can set up and enable OAuth 2.0 for
your web-application.
Figure:
OAuth 2.0 Overview

Additional Information about OAuth 2.0
OAuth is an industry-standard authorization protocol that enables an application to
delegate limited access to another application. For more information about the OAuth
open technical standard, see this OAuth 2.0 description from the official OAuth
website:
How to Set Up OAuth 2.0
This overview describes the steps that you and the merchant must complete to implement
OAuth.
Figure:
OAuth 2.0 Implementation

- You enable mutual authentication by obtaining a Certificate Signing Request (CSR) from a supported certificate authority (CA). After obtaining a CSR, you provide your common name details toCybersource. For more information, see Enable Mutual Authentication.
- You register your web-application in theBusiness Centerand set a scope of permissions and a redirect URL to your web-application. For more information, see Register Your Application.
- The merchant accesses your web-application, logs into their account using their credentials, and clicks a button or link to set up theirCybersourceaccount.
- Your application redirects the merchant to aCybersource-hosted webpage. For more information, see Redirect the Merchant.
- The merchant logs in to theirCybersourceaccount and approves your request. This authorizes your web-application to perform specific actions on their behalf which are set by the permissions scope that the merchant approved. Notify the merchant that their account must have access to grant OAuth permissions to complete this requirement.
- Cybersourceredirects the merchant to your application using the redirect URL you registered. An authentication code is appended to the redirect URL. For more information, see Interpreting the Redirect Response.
- Your application exchanges the authorization code withCybersourcefor these two tokens:
- Access token: A token to authenticate transactions usingCybersource. For more information about how to authenticateCybersourcetransactions using this token, see Submit API Requests Using OAuth.
- Refresh token: A token that you can use to request additional access tokens.
For more information about requesting tokens, see Request the Access and Refresh Tokens.For more information about refreshing your existing tokens, see Refresh the Access Token and Refresh the Refresh Token.
To change the permissions the merchant grants you, you must repeat steps 2–7.
You can view examples of these steps in the demo
application.
You must obtain test merchant credentials to emulate the access delegation. Your test account
must contain at least one card-based transaction from within the past 7 days. To sign up for a
sandbox test account to create your test credentials, see:
Enable Mutual Authentication
OAuth uses
mutual authentication
to provide an additional layer of security. Mutual
authentication occurs when a client and server verify each other’s identities simultaneously.
To enable mutual authentication, you must use a server-to-server certificate issued by a
trusted Certificate Authority (CA). Before you can register your application with Cybersource
, you must create one of these supported DigiCert CAs and enable mutual
authentication:- Supported DigiCert CAs
- X9 Financial PKI – ECC P-256 Root
- X9 Financial PKI – RSA 2048 Root
- X9 Financial PKI – RSA 4096 Root
- Contact support to obtain a certificate from DigiCert:https://www.digicert.com/contact-us
Deprecated DigiCert CAs and Transition Guidance
These CAs are no longer supported:
- DigiCert Assured ID Root G2
- DigiCert Global G2 TLS RSA SHA256 2020 CA1
- DigiCert High Assurance EV Root CA
- DigiCert SHA2 Extended Validation Server CA
IMPORTANT
If your current integration uses a deprecated DigiCert CA, obtain one of the supported
certificates when your existing certificates expire or are due for renewal.
DigiCert has announced that the Client Authentication EKU will be removed from public TLS
certificates to comply with industry requirements. Without this EKU, certificates cannot be
used for client authentication in mTLS, which is essential for secure OAuth integrations. If
your organization uses DigiCert certificates for mTLS, client authentication, or
server-to-server authentication, review the DigiCert article
"What should I do to prepare for the Client
Authentication EKU removal from public TLS certificates?"
. This article
explains if your certificate usage is affected and describes DigiCert alternatives.To download the supported X9 production root and intermediate certificates used for mTLS,
see the DigiCert article
X9 Production Certificates for mTLS
. Set Up Tasks
You must complete these tasks to enable mutual authentication:
- Create a new key pair and Certificate Signing Request, using a server-to-server certificate from your CA.
- Submit the Certificate Signing Request (CSR) to support for your CA and provide the required details.
- Your CA verifies your request, and if they approve it, they issue the certificate in an email to the technical contact for your account.
- Give the certificate's common name to yourCybersourcetechnical contact. Your technical contact adds it to theCybersourcewhitelist.IMPORTANTYour certificate's common name can only contain up to 40 characters.
To test your own application, you can use the certificate that is available
with the
Cybersource
sample application code, hosted on Github.Register Your Application
Before you can use OAuth credentials to connect to
Cybersource
, you
must register your application in the Business Center
. To obtain credentials, contact
Cybersource
support:- Log in to theBusiness Center:
- ClickAccount Managementin the left-navigation menu and chooseAuthorized Applications. The OAuth Authorized Applications page appears.
- ClickAdd Application. You must use an administrator account to add or change an application.
- Enter this information:
- Name of the application that you are registering.
- Description of the application.
- URL to redirect the merchant to your system after they grant permissions. For more information about the redirect, see Redirecting the Merchant toCybersource.
- Choose permissions for individual APIs or for all listed APIs.
- ClickSave.Your application is registered, and your application’s client ID and client secret are shown. You will need them in order to redirect the merchant. Treat the client ID and client secret as confidential information and store them securely. You can regenerate your client secret if you misplace it or if its security is compromised.
- ClickDoneto return to the previous page.
Redirect the Merchant
Your application must redirect the merchant to
Cybersource
so that the
merchant can log in with their Cybersource
credentials and provide permissions
for your application.IMPORTANT
A merchant giving permissions to your application must log in as an
Account Owner or Account Administrator.
After the merchant provides or denies permissions for your application,
Cybersource
redirects the merchant to the redirect URL that you provided when you
registered. If the merchant attempted to grant permissions using an account with insufficient
privileges, the redirect response is the same as when a merchant denies permission. When you redirect the merchant to
Cybersource
, encode the URL with the
following parameters as a query string:Parameter Name | Required | Notes |
|---|---|---|
sub | Yes | Must be set to oauth . |
client_id | Yes | The client ID that you received when you registered
your application in the Business Center . |
redirect_url | Yes | The page to which Cybersource redirects
the merchant after the merchant grants your application permissions. The value of the
redirect_url parameter must exactly match the redirect URL that you
supplied during registration. |
state | No | Value that is sent in the response to prevent malicious
interception, such as a CSRF attack. |
Sample Redirect for Testing
https://businesscentertest.cybersource.com/ebc2/oauth/authorize?sub=oauth&redirect_url=
https://www.example.com&client_id=yourClientId&state=StateValue
Sample Redirect for Production
https://businesscenter.cybersource.com/ebc2/oauth/authorize?sub=oauth&redirect_url=
https://www.example.com&client_id=yourClientId&state=StateValue
Interpreting the Redirect Response
After your application redirects the merchant to
Cybersource
, this sequence
occurs.- Merchants not logged in to theBusiness Centerat the time of the redirect are prompted to do so. Merchants with expired credentials are prompted to reset them, after which they must click the redirect link again.
- TheBusiness Centerpage opens, stating the partner's name along with the permissions that the partner is requesting from the merchant. If the merchant logged in using an account with sufficient privileges, the they are prompted to chooseAlloworDeny. If the logged-in user does not have sufficient privileges, theAllowbutton is disabled.
- If the merchant clicksDeny,Cybersourceredirects the merchant to the URL that you defined in yourredirect_urlparameter with no parameters appended to it. This is not a failure but a denial of permission by the merchant's representative. The denial does not prohibit any future attempt for this or any merchant.
- When the merchant clicksAllow,Cybersourceredirects the merchant to the URL that you defined in yourredirect_urlparameter.The redirect URL in theCybersourceresponse is encoded with at least one of these parameters:ParameterDescriptioncodeThe authorization code that your application sends toCybersourcewhen requesting an access token (during the next step of the authentication process). For security reasons, the authorization code expires inten minutes. If it expires, you must repeat the redirect to request another.stateThis parameter is returned only if it was submitted in the request. It is used to test for possible CSRF attacks. If the state values from the request and response do not match, you could be the victim of a CSRF attack, and you should display an HTTP 401 error code in response.
Request the Access and Refresh Tokens
Use the authorization code from the redirect response to request an initial access token,
as well as a refresh token, from the
/oauth/v3/token
endpoint. While a
header is not required, we recommend including the header
v-c-client-correlation-id
with a unique value for every request to
the /oauth/v3/token
endpoint. For security, all parameters must be sent
in the body and use the HTTPS protocol. Do not place any parameters in the URL. - Test URL:
- Production URL:
Sample Token Request
POST https://api-ma.cybersource.com/oauth2/v3/token
Content-Type: application/x-www-form-urlencoded

client_id=8l57hYffFb&grant_type=refresh_token&code=eyJraK&client_secret=yourClientSecret
Parameter Name | Value | Description |
|---|---|---|
grant_type | Set to authorization_code . | Required. Determines which type of flow
the Authorization Server uses to acquire user authorization. |
code | The authorization code received from
the redirect response. | Required. The value passed in this
parameter must exactly match the value supplied by the OAuth server
during the authorization step. |
client_id | The client ID obtained during client
registration. | Required. Indicates the client that is
making the request. |
client_secret | The client secret value obtained during
client registration. | Required. You received this value when
you registered your application with Cybersource . |
Sample Response for Access Token
Request
HTTP/1.1 200 OK

Content-Type: application/json;charset=UTF-8

Cache-Control: no-store

Pragma: no-cache

{

"access_token": "eyJraWQiOiIxMGM2MTYxNzg2MzE2ZWMzMGJjZmI5ZDcyZGU4MzFjOSIsImFsZyI6IlJTMjU2In0.
 eyJqdGkiOiI5YTM0MWVkZC0zY2ViLTRiMzYtYjQyMy05MDg4ZTliYWQ1YTAiLCJzY29wZXMiOlsiYWx0ZXJuYXRlX3B
 heW1lbnRzIiwiYmFua190cmFuc2ZlcnMiLCJib2FyZGluZyIsImNvbW1lcmNlX3NlcnZpY2VzIiwiZnJhdWRfbWFuYW
 dlbWVudCIsImludm9pY2luZyIsImtleXMiLCJtYW5hZ2Vfc2VjdXJlX2FjY2VwdGFuY2UiLCJwYXltZW50c193aXRoX
 3N0YW5kYWxvbmVfY3JlZGl0IiwicGF5bWVudHNfd2l0aG91dF9zdGFuZGFsb25lX2NyZWRpdCIsInBheW91dHMiLCJy
 ZXBvcnRpbmciLCJ0b2tlbml6YXRpb25fc2VydmljZXMiLCJ0cmFuc2FjdGlvbnMiLCJ1c2VycyJdLCJpYXQiOjE2MTk
 1MTg3MzY4OTUsImFzc29jaWF0ZWRfaWQiOiJzYW1wbGVwYXJ0bmVyIiwiY2xpZW50X2lkIjoidjZUSkgxSXFoTSIsIm1
 lcmNoYW50X2lkIjoicmFodWxyYW1hIiwiZXhwaXJlc19pbiI6MTYxOTUxOTYzNjg5NSwiZ3JhbnRfdHlwZSI6ImF1dGh
 vcml6YXRpb25fY29kZSIsImdyYW50X3RpbWUiOiIyMDIxMDQyNzAzMTgifQ.jhjH9_xxleoNKgidD9oduVuUqDGov2X6
 22gzh99_QeocFc-7KsndsdaaUqglRpfY8juCbtRIe8RhLa5_hIoKF3ZU3XJ4WnQeAXdbznjf0SfK2SHpih-Tl2u_Ufsl
 Q7WjJM3OVDRcV3udMKfe6ACX0_uH81vRobRK43kk1RjrKuQSWz6KRRmSGrHJWl2sbo0gdEQEZpnGQwVcJuGKYalOk6Xq
 vglu2nD7iNyZpaaXOJHVDqxNdQdz8vfkofBPFVcTMjx8cHge3gDOFWDce5-TIU2EGdD_nUUfh8OfXaMrvv6nBriKzG96
 j7SQm3BXfwfm6SzSIyBpiti3sgwGJs-vGA",

"token_type": "bearer",

"refresh_token": "eyJraWQiOiIxMGM2MTYxNzg2MzE2ZWMzMGJjZmI5ZDcyZGU4MzFjOSIsImFsZyI6IlJTMjU2In0.
 eyJqdGkiOiJmMTA2YjU1Yy00MjA1LTRjZDctOTkzNy04MzM3YTdjNmZmYWMiLCJzY29wZXMiOlsiYWx0ZXJuYXRlX3Bhe
 W1lbnRzIiwiYmFua190cmFuc2ZlcnMiLCJib2FyZGluZyIsImNvbW1lcmNlX3NlcnZpY2VzIiwiZnJhdWRfbWFuYWdlbW
 VudCIsImludm9pY2luZyIsImtleXMiLCJtYW5hZ2Vfc2VjdXJlX2FjY2VwdGFuY2UiLCJwYXltZW50c193aXRoX3N0YW5
 kYWxvbmVfY3JlZGl0IiwicGF5bWVudHNfd2l0aG91dF9zdGFuZGFsb25lX2NyZWRpdCIsInBheW91dHMiLCJyZXBvcnRp
 bmciLCJ0b2tlbml6YXRpb25fc2VydmljZXMiLCJ0cmFuc2FjdGlvbnMiLCJ1c2VycyJdLCJpYXQiOjE2MTk1MTg3MzY4O
 DksImFzc29jaWF0ZWRfaWQiOiJzYW1wbGVwYXJ0bmVyIiwiY2xpZW50X2lkIjoidjZUSkgxSXFoTSIsIm1lcmNoYW50X2
 lkIjoicmFodWxyYW1hIiwiZXhwaXJlc19pbiI6MTY1MTA1NDczNjg4OCwidG9rZW5fdHlwZSI6InJlZnJlc2hfdG9rZW4
 iLCJncmFudF90eXBlIjoiYXV0aG9yaXphdGlvbl9jb2RlIiwiZ3JhbnRfdGltZSI6IjIwMjEwNDI3MDMxOCJ9.Sj5y5ld
 pM4-ie5YT6_ARu6H0Ikd7jOhNvKsWgDB5NTxHvbyS5ciMidAIvxoxOXS_0vPpf1u865w8Qu8yT82iHHbNxyjjBXy03wbS
 utJBen_5roFUi6XE7KFgZPKL2hixmRVgivTrA8uAZ798Griv0PUOPnm6y6AzmK1ffmwdSNejKBdvz3_38TLLJk_0ylkRp
 D9akM8bSpDMSJJLNd3_eER5jdOQWRlqgaC030crrksS7o-vFJxXsK3MN0-_qnVqV5-l-8vhjJ0VUzg66eUgIyphIzU2c0
 M2J9d5tJVncHqOFz8N8HUZ800xKxMKH1MlB7F3L8alJJ04Jk6edT0KXA",

"expires_in": 899,

"scope": "transactions",

"refresh_token_expires_in": 31535999,

"client_status": "active"

}
Error Code | Description |
|---|---|
access_denied | The resource owner or authorization server denied the
request. |
server_error | The authorization server encountered an unexpected condition
that prevented it from fulfilling the request. This error code is
needed because a 500 Internal Server Error HTTP status code cannot
be returned to the client by an HTTP redirect. |
invalid_scope | The requested scope is invalid, unknown, or
malformed. |
invalid_client | The requested client ID is invalid, unknown, or
malformed. |
invalid_request | The request is missing a required parameter, includes an
invalid parameter value, includes a parameter more than once, or is
otherwise malformed. |
unauthorized_client | The client is not authorized to request an authorization
code. |
invalid_redirect_uri | The requested redirect URI is invalid, unknown, or
malformed. |
client_not_found | The requested client ID is not found in the system. |
invalid_client_type | The requested client ID is registered with an invalid client
type (only confidential clients are supported). |
merchant_not_active | The authorization could not be completed because the
merchant's Cybersource account is inactive. |
client_not_active | The authorization could not be completed because your
Cybersource Partner Account is not currently
listed as active. Contact customer support for assistance. |
Submit API Requests Using OAuth
You can submit API requests on behalf of the merchant using the access token. The access
token expires after 15 minutes.
Include the access token in the
Authorization
header as shown below.IMPORTANT
Not all API endpoints are currently enabled for OAuth. For a list
of OAuth-enabled endpoints, contact
Cybersource
support: Example: Authorization Header with Access Token
Authorization: Bearer eyJraWQiOiIyNmRjfjVkZTdlMmYwYTI0ODg0MjU1YjIwZWJjMGY0MSIsImFs

curl -X POST -H "Authorization: Bearer ACCESS_TOKEN""https://api-ma.cybersource.com/pts/v2/payments"
Error Response
If the token is expired or the user is unauthorized, the API responds with a 401 HTTP status
code.
Expired Token
{
  "response": {
    "rmsg": {
      "error":"ACCESS_TOKEN_EXPIRED",
      "error_description":"ACCESS_TOKEN_EXPIRED
    }
  }
}
Unauthorized Partner
{
  "response": {
    "rmsg": {
      "error": "UNAUTHORIZED_PARTNER",
      "error_description": "UNAUTHORIZED_PARTNER"
    }
  }
}
Refresh the Access Token
Access tokens expire after 15 minutes and refresh tokens expire after a year. To refresh
the access token using the refresh token, follow the example below. We recommend
including the header
v-c-client-correlation-id
with a unique value for
every request to /token
.Any token request failure results in an HTTP status code of
500 Server error
.
Correct any errors and resend. Request to Refresh the Access
Token
POSThttps://api-ma.cybersource.com/oauth2/v3/token Content-Type: application/x-www-form-urlencodedclient_id=8l57hYffFb&client_secret=yourClientSecret&grant_type=refresh_token&refresh_token=eyJraWQiOiI4MGI2ZDJjM2NkZGRkMmY2NmY3MmRjYjIyMmZiNGM1MCIsImFsZyI6IlJTMjU2In0.eyJqdGkiOiI0N2E4OGY0 MS04ZTI5LTRhMTQtOWZlYi0wZjM0OTM2ZDk0M2QiLCJzY29wZXMiOlsicmVhZCIsIndyaXRlIiwiZGVsZXRlIl0sImlhdCI6 MTQ3MTU3MDEyODQ5OCwiY2xpZW50X2lkIjoiOGw1N0lZZmZGYiIsIm1lcmNoYW50X2lkIjoiMzI1MzY4IiwiZXhwaXJlc19p biI6MTQ3MTU5ODkyODQ5OH0.lDvGlZvjkgY5pcJEG5Y1d6o7mOiZA-up2MsGm6zVhZdZxiSDt7md7Ih4_Lkko63_-Fz6UXMg 7SLt6ypVJqn3u2iqKRy8aiuSxhQCwAuenoqFFdsFEEqlqkEtDZeo6B3_YrrTeCdjyP_cpLf7vr9GKJS3k5snYGhL8sZrEQMx JaQsyz6F_IPrxajmMiLt4nJUJJgRTjF-krt8p-BBLGxOYCBXe8UPrpsmLnxlEPiwJcFYREimEMSkeD2uDShWXe-ociLWFtoX mYx50TDk_fx2hKRaOVHtnaQJdsgtnQrlc0UkFAOzp9fU45O2Vei7x8SPNA47NdoR1XmPK2ZnXm_TIA
Response from Refresh
Request
HTTP/1.1 200 OK
Content-Type: application/json;charset=UTF-8
Cache-Control: no-store
Pragma: no-cache

{
"access_token": "eyJraWQiOiI4MGI2ZDJjM2NkZGRkMmY2NmY3MmRjYjIyMmZiNGM1MCIsImFsZy
I6IlJTMjU2In0.eyJqdGkiOiI0Y2E5NGUyNy04NzkzLTRmOGQtYjY4YS01OWM0MjMwODlhZDAiLCJzY
29wZXMiOlsicmVhZCIsIndyaXRlIiwiZGVsZXRlIl0sImlhdCI6MTQ3MTU3MDE5NjM0MiwiY2xpZW50
X2lkIjoiOGw1N0lZZmZGYiIsIm1lcmNoYW50X2lkIjoiMzI1MzY4IiwiZXhwaXJlc19pbiI6MTQ3MTU
5ODk5NjM0Mn0.cmYor7iW6lxRCiM3kWPKauMsiKNGwRrrRFKowcTdkRQewqbQ0Mn9As1RhZwDKL4dux
CzAzLw4e8aV8PUyd2-_eCUsqbPMWLWjGo75eU8GI9rrvSGTxEP-fr6jPAr-jBJekQTzMLgkKVtSGaJg
tz08dHqrJnrejR8rZs4h1GpPMk6i99cOVMHjuTV7ZzognvkLKj_OR01H4XK5M8TWH5uoAXWrII3K-JJ
V1YkzjpVkpS0tVXTIXJI-pk_eNeBaJ7Q6in9X3xQKXnIqA8I8zxZt3LNnxR-aui2yufzP5BDh2kfwU0
B1Uq8fEuqNmbj4HN1NrmnTHkRJTZ4ooYoqAQtnQ",

"token_type": "bearer",

"refresh_token": "eyJraWQiOiI4MGI2ZDJjM2NkZGRkMmY2NmY3MmRjYjIyMmZiNGM1MCIsImFsZ
yI6IlJTMjU2In0.eyJqdGkiOiI4N2IxNDg2MC03YzI0LTQ0NmQtOWJlYS05Mzk2ZDI3MmNmOWQiLCJz
Y29wZXMiOlsicmVhZCIsIndyaXRlIiwiZGVsZXRlIl0sImlhdCI6MTQ3MTU3MDE5NjMyMywiY2xpZW5
0X2lkIjoiOGw1N0lZZmZGYiIsIm1lcmNoYW50X2lkIjoiMzI1MzY4IiwiZXhwaXJlc19pbiI6MTQ3MT
U5ODk5NjMyM30.Fn8ZlXgvGBr-uvDi6e7-72g8tP-u42T5FNW5NW4YQ7GkrMqUEthexGc9NOcf6uWYf
SD4EiSbDVO8EIojZzIUgyXmG3tYDgSejFcDSPcMrF11m9WkOcapbIFTnFk2OyPVi48BVZ6vNb7j2184
pJ3KHKoq9E7qlaKrEbvBn2HRVdtvb1yj1Xv1tH38I6Qong8xMAEMCcIfzTinEOFIbENYzgxBsSNVrS1
5CYtDRFEDPGmAVPzd4I7HN_ed-pzOET3YbUBBQUbrAuZSrSrBcgfBCtT9C5szd7tYXmi-1AMVdFybnV
XArAXsDX0nZzm-PuCi_DGKMJET0sY2QNyesyKv8w",

"expires_in": 28798,

"scope": "payments_with_standalone_credit",

"refresh_token_expires_in": 28799,

"client_status": "active"
Refresh the Refresh Token
Access tokens expire after 15 minutes and refresh tokens expire after a year. Merchants are not
required to reapprove access after a year; the refresh token's expiration resets to one
year after the last successful access token request. You are not required to use an
authorization code to make this call.
Below is an example of a request to obtain a new refresh token. We recommend including the
header
v-c-client-correlation-id
with a unique value for every request to
the /token
endpoint.Any token request failure results in an HTTP status code of 500 - Server error. Correct any
errors and resend.
We provide a 6-month grace period to request a new refresh token. The new refresh token will
expire one year from the last refresh token request. If the merchant has not had any
activity within that grace period, they must be prompted to grant authorization and delegate
access.
Request to Refresh the Refresh Token
POSThttps://api-ma.cybersource.com/oauth2/v3/token Content-Type: application/x-www-form-urlencoded client_id =8l57hYffFb& client_secret =yourClientSecret& grant_type =refresh_token& refresh_token =eyJraWQiOiI4MGI2ZDJjM2NkZGRkMmY2NmY3MmRjYjIyMmZiNGM1MCIsImFsZyI6IlJTMjU2In0. eyJqdGkiOiI0N2E4OGY0MS04ZTI5LTRhMTQtOWZlYi0wZjM0OTM2ZDk0M2QiLCJzY29wZXMiOlsi cmVhZCIsIndyaXRlIiwiZGVsZXRlIl0sImlhdCI6MTQ3MTU3MDEyODQ5OCwiY2xpZW50X2lkIjoi OGw1N0lZZmZGYiIsIm1lcmNoYW50X2lkIjoiMzI1MzY4IiwiZXhwaXJlc19pbiI6MTQ3MTU5ODky ODQ5OH0.lDvGlZvjkgY5pcJEG5Y1d6o7mOiZA-up2MsGm6zVhZdZxiSDt7md7Ih4_Lkko63_ -Fz6UXMg7SLt6ypVJqn3u2iqKRy8aiuSxhQCwAuenoqFFdsFEEqlqkEtDZeo6B3_YrrTeCdjyP_ cpLf7vr9GKJS3k5snYGhL8sZrEQMxJaQsyz6F_IPrxajmMiLt4nJUJJgRTjF-krt8p-BBLGxOYCB Xe8UPrpsmLnxlEPiwJcFYREimEMSkeD2uDShWXe-ociLWFtoXmYx50TDk_fx2hKRaOVHtnaQJdsg tnQrlc0UkFAOzp9fU45O2Vei7x8SPNA47NdoR1XmPK2ZnXm_TIA
Response from Refreshing the Refresh Request
HTTP/1.1 200 OK

Content-Type: application/json;charset=UTF-8

Cache-Control: no-store

Pragma: no-cache

{

"access_token": "eyJraWQiOiI4MGI2ZDJjM2NkZGRkMmY2NmY3MmRjYjIyMmZiNGM1MCI
 sImFsZyI6IlJTMjU2In0.eyJqdGkiOiI0Y2E5NGUyNy04NzkzLTRmOGQtYjY4YS01OWM0Mj
 MwODlhZDAiLCJzY29wZXMiOlsicmVhZCIsIndyaXRlIiwiZGVsZXRlIl0sImlhdCI6MTQ3M
 TU3MDE5NjM0MiwiY2xpZW50X2lkIjoiOGw1N0lZZmZGYiIsIm1lcmNoYW50X2lkIjoiMzI1
 MzY4IiwiZXhwaXJlc19pbiI6MTQ3MTU5ODk5NjM0Mn0.cmYor7iW6lxRCiM3kWPKauMsiKN
 GwRrrRFKowcTdkRQewqbQ0Mn9As1RhZwDKL4duxCzAzLw4e8aV8PUyd2-_eCUsqbPMWLWjG
 o75eU8GI9rrvSGTxEP-fr6jPAr-jBJekQTzMLgkKVtSGaJgtz08dHqrJnrejR8rZs4h1GpP
 Mk6i99cOVMHjuTV7ZzognvkLKj_OR01H4XK5M8TWH5uoAXWrII3K-JJV1YkzjpVkpS0tVXTIXJI-pk_
 eNeBaJ7Q6in9X3xQKXnIqA8I8zxZt3LNnxR-aui2yufzP5BDh2kfwU0B1Uq8fEuqNmbj4HN1NrmnTHkRJTZ4ooYoqAQtnQ",

"token_type": "bearer",

"refresh_token": "eyJraWQiOiI4MGI2ZDJjM2NkZGRkMmY2NmY3MmRjYjIyMmZiNGM1MCI
 sImFsZyI6IlJTMjU2In0.eyJqdGkiOiI4N2IxNDg2MC03YzI0LTQ0NmQtOWJlYS05Mzk2ZDI
 3MmNmOWQiLCJzY29wZXMiOlsicmVhZCIsIndyaXRlIiwiZGVsZXRlIl0sImlhdCI6MTQ3MTU
 3MDE5NjMyMywiY2xpZW50X2lkIjoiOGw1N0lZZmZGYiIsIm1lcmNoYW50X2lkIjoiMzI1MzY
 4IiwiZXhwaXJlc19pbiI6MTQ3MTU5ODk5NjMyM30.Fn8ZlXgvGBr-uvDi6e7-72g8tP-u42T
 5FNW5NW4YQ7GkrMqUEthexGc9NOcf6uWYfSD4EiSbDVO8EIojZzIUgyXmG3tYDgSejFcDSPc
 MrF11m9WkOcapbIFTnFk2OyPVi48BVZ6vNb7j2184pJ3KHKoq9E7qlaKrEbvBn2HRVdtvb1y
 j1Xv1tH38I6Qong8xMAEMCcIfzTinEOFIbENYzgxBsSNVrS15CYtDRFEDPGmAVPzd4I7HN_
 ed-pzOET3YbUBBQUbrAuZSrSrBcgfBCtT9C5szd7tYXmi-1AMVdFybnVXArAXsDX0nZzm-PuCi_DGKMJET0sY2QNyesyKv8w",

"expires_in": 899,

"scope": "transactions",

"refresh_token_expires_in": 31535999,

"client_status": "active"

}
Revoke Permissions
Merchants can revoke the permissions that they granted to your application. If a merchant
revokes your application’s permissions in the
Business Center
, any current
access token is immediately invalidated, and no new access tokens can be generated. If
the merchant decides to grant permissions to your application in the future, they must
visit your web-application and begin the permissions process again.Contact Support
If you have questions or are interested in becoming a pilot partner, contact
Cybersource
support: