On This Page
Tink Pay by Bank Developer Guide
This section describes how to use this guide and where to find further information.
- Audience and Purpose
- This guide is intended for merchant developers who want to offer the Tink Pay by Bank payment option on their online stores.
- Conventions
- This statement appears in this document:IMPORTANTAnImportantstatement contains information essential to successfully completing a task or learning a concept.
- Customer Support
- For support information about any service, visit the Support Center:
Pilot Release
This document describes the pilot release of the Tink Pay by Bank Developer Guide.
Recent Revisions to This Document
25.08.01
Pilot release.
VISA Platform Connect: Specifications and Conditions for
Resellers/Partners
The following are specifications and conditions that apply to a Reseller/Partner enabling
its merchants through
Cybersource for
. Failure to meet any of the specifications and conditions below is
subject to the liability provisions and indemnification obligations under
Reseller/Partner’s contract with Visa/Cybersource.Visa Platform Connect
(“VPC”)
processing- Before boarding merchants for payment processing on a VPC acquirer’s connection, Reseller/Partner and the VPC acquirer must have a contract or other legal agreement that permits Reseller/Partner to enable its merchants to process payments with the acquirer through the dedicated VPC connection and/or traditional connection with such VPC acquirer.
- Reseller/Partner is responsible for boarding and enabling its merchants in accordance with the terms of the contract or other legal agreement with the relevant VPC acquirer.
- Reseller/Partner acknowledges and agrees that all considerations and fees associated with chargebacks, interchange downgrades, settlement issues, funding delays, and other processing related activities are strictly between Reseller and the relevant VPC acquirer.
- Reseller/Partner acknowledges and agrees that the relevant VPC acquirer is responsible for payment processing issues, including but not limited to, transaction declines by network/issuer, decline rates, and interchange qualification, as may be agreed to or outlined in the contract or other legal agreement between Reseller/Partner and such VPC acquirer.
DISCLAIMER: NEITHER VISA NOR CYBERSOURCE WILL BE RESPONSIBLE OR LIABLE FOR ANY ERRORS OR
OMISSIONS BY THE
Visa Platform Connect
ACQUIRER IN PROCESSING TRANSACTIONS. NEITHER VISA
NOR CYBERSOURCE WILL BE RESPONSIBLE OR LIABLE FOR RESELLER/PARTNER BOARDING MERCHANTS OR
ENABLING MERCHANT PROCESSING IN VIOLATION OF THE TERMS AND CONDITIONS IMPOSED BY THE
RELEVANT Visa Platform Connect
ACQUIRER. Introduction to Tink Pay by Bank
Cybersource
offers Tink Pay by Bank, an innovative payment method that
lets your e-commerce customers pay seamlessly and securely directly from their bank
accounts. When using Tink, your customers do not have to enter their card information.
Instead, by integrating Tink into your checkout experience, your customers choose the
Pay by Bank
option. This checkout option enables your customers to select
their bank from a list of trusted partner banks to authorize the payment. When the
payment is approved, the funds move quickly and securely from your customer's account to
your merchant account. This fast and reliable payment method is an account-to-account
(A2A) transfer.You can also subscribe to receive real-time transaction notifications by using the
Webhooks API.
Benefits of Using Tink Pay by Bank
Tink Pay by Bank makes processing e-commerce payments simpler, faster, and more
secure by:
- Immediately transferring funds from the customer's account to your merchant bank account.
- Reducing the amount of customer data you store.
- Using a customer's bank authentication network to securely process payments.
- Avoiding card processing fees.
Supported Country and Currency
Tink Pay by Bank is available in the United Kingdom (UK) and supports payments using
the British pound sterling (GBP).
Requirements
These are the requirements for processing transactions using Tink Pay by Bank:
- Merchant ID (MID). To sign up for a sandbox account to create a MID, see the Sandbox Account Sign Up page.
- REST API security key. To create a key with an existing merchant account, see theCreating and Using Security Keys User Guide. If you sign up for a sandbox account, the sign up process creates a test key.
- Tink Pay by Bank enabled for your merchant account. To enable Tink, contact your account manager.
- Add Tink Pay by Bank to your check out experience.
- To receive real-time transaction notifications, you must create a webhook subscription. If you have not set up your system to support webhooks, see theWebhooks Implementation Guide for the REST API.
Getting Started with REST
To begin processing payments through
Cybersource
, you must first set
up your payment processing system to be REST compliant. Cybersource
uses the REST architecture for developing web services. REST enables communication
between a client and server using HTTP protocols. If you have not set up secure communications between your client and server using
either a
JSON Web Token
or HTTP signature
, see the Getting Started with REST
Developer Guide
.How to Process a Payment Workflow
This workflow illustrates a successful payment using Tink Pay by Bank.
Figure:
Process a Payment Workflow

- The customer begins to check out on your website and chooses the Tink Pay by Bank payment option. This option enables the customer to choose their bank from a list of available partner banks.
- You send a sale request toCybersource. For more information, see Process a Sale.
- Cybersourceresponds with aPENDINGstatus, sale request ID, and the Tink redirect URL.
- You redirect the customer to the Tink URL.
- The customer uses their bank account to approve the payment and is redirected to your website.
- If you subscribe to webhook notifications,Cybersourcesends you an automaticSETTLEDnotification when the sale is complete. For more information, see Create a Webhook Subscription.
- If you do not receive a webhook notification, or you are not subscribed to webhook notifications, you send periodic check status requests with the sale request ID toCybersourceuntil you receive an updated status. For more information, see Check a Status.
- Cybersourceresponds to your check status request with aSETTLEDstatus, which confirms that the payment is complete.
- You confirm the payment to the customer.
Response Statuses for a Payment Workflow
This workflow illustrates the statuses that can occur at each stage of the payment
process using API requests.
Figure:
Response Statuses for a Payment Workflow

- You send a sale request and receive one of these possible statuses:
- FAILED: The sale request is unsuccessful. A possible reason is invalid fields or missing fields in the request.
- PENDING: The sale request is successful and is currently processing. Send check status requests until the status updates.
- You send periodic check status requests for the pending sale and receive one of these possible statuses:
- CANCELLED: The customer did not complete checkout using the redirect URL.
- FAILED: The sale request is unsuccessful. A possible reason is invalid fields or missing fields in the request.
- PENDING: The sale request is successful and is currently processing. Send check status requests until the status updates.
- SETTLE_INITIATED: The customer completed checkout and Tink Pay by Bank is processing the sale.
- SETTLED: The sale is complete. You can confirm the purchase with the customer.
Transaction Requests
This section describes how to process transactions using the
REST API
.Process a Sale
This section describes how you can send a sale request to begin processing a payment.
After sending a sale request, a successful response includes a
PENDING
status in the status
field and a sale request ID in the
id
field. Save the request ID to send follow-on check status
requests. You must send check status requests to know when the sale is settled.Merchant Redirect URLs
When your customer is redirected to their bank's website during checkout, they can
experience one of these outcomes:
- Canceled purchase
- Failed purchase
- Successful purchase
Depending on which outcome your customer experiences determines which of your
merchant URLs the customer is redirected to. Tink requires you to provide your
redirect URLs in your sale request. To provide your redirect URLs, you can choose
one of these options:
- Configure your redirect URLs in theBusiness Centerin
 Available Products. Your merchant account must be enabled to access Product
Configuration: Alternative Payment Methods.
- Contact yourCybersourceaccount manager to update your merchant account.
- Include these fields in your sale request:
- Set to the URL to which the customer is redirected after canceling a payment or closing the browser.
- Set to the URL to which the customer is redirected when a payment fails because of insufficient funds or because the issuer declines it.
- Set to the URL to which the customer is redirected after completing a payment. Do not use this URL to confirm a payment because the reply is not signed and it could be tampered with.Cybersourcerecommends that the success URL link to a static webpage with text that tells the customer their payment is being processed. A follow-up email or webpage can then be used to inform them when their payment is successful.
If your account is configured to include your redirect URLs, and you send these fields in your sale request,Cybersourceuses the URLs you include in the fields.
Endpoints
Production:
POST
https://api.cybersource.com
/pts/v2/paymentsTest:
POST
https://apitest.cybersource.com
/pts/v2/paymentsRequired Fields for Processing a Sale
- This field is optional if your account is configured to automatically include your redirect URLs.
- This field is optional if your account is configured to automatically include your redirect URLs.
- This field is optional if your account is configured to automatically include your redirect URLs.
- Set toGBP.
- Set toUK.
- Set totinkPayByBank.
- Set tobankTransfer.
- Set to[AP_SALE].
Optional Fields for Processing a Sale
- Set to a unique value for your internal tracking purposes.
- paymentInformation.bank.swiftCode
- paymentInformation.directDebit.mandate.clearingDate
- paymentInformation.options.id
Example: Processing a Sale
Request
{
    "paymentInformation": {
        "paymentType": {
            "name": "bankTransfer",
            "method": {
                "name": "tinkPayByBank"
            }
        }
    },
    "processingInformation": {
        "actionList": [
            "AP_SALE"
        ]
    },
    "orderInformation": {
        "amountDetails": {
            "totalAmount": "50.00",
            "currency": "GBP"
        },
        "billTo": {
            "country": "UK"
        }
    }
}
Request + Redirect URLs
{
    "paymentInformation": {
        "paymentType": {
            "name": "bankTransfer",
            "method": {
                "name": "tinkPayByBank"
            }
        }
    },
    "processingInformation": {
        "actionList": [
            "AP_SALE"
        ]
    },
    "merchantInformation": {
    "cancelUrl": "merchant_cancel_url.com",
    "successUrl": "merchant_success_url.com",
    "failureUrl": "merchant_failure_url.com"
  },
    "orderInformation": {
        "amountDetails": {
            "totalAmount": "50.00",
            "currency": "GBP"
        },
        "billTo": {
            "country": "UK"
        }
    }
}
Response to a Successful Request
{
    "processorInformation": {
        "responseCode": "00001",
        "transactionId": "cd8ec59f-5b73-4efe-9789-952fa1475b43",
        "paymentUrl": "https://link.staging.oxford.tink.se/1.0/pay/direct?market=GB&session_id=2b3bc1e13e334d5bb86245ae5f1c31449d38004b3d5842248a80463a766be788&redirect_uri=https%3A%2F%2Fapi.staging.oxford.tink.com%2Fpayments%2Fv1%2Fcybersource%2Fcallback&payment_request_id=cd8ec59f-5b73-4efe-9789-952fa1475b43&locale=en_US&client_id=5b4c4850e3e240e28f74c4be0ce11405"
    },
    "orderInformation": {
        "amountDetails": {
            "totalAmount": "50.00",
            "currency": "GBP"
        }
    },
    "reconciliationId": "KOJMTDIN58M3",
    "message": "Request was processed successfully.",
    "status": "PENDING",
    "id": "7537195501166875104805",
    "submitTimeUtc": "2025-07-28T16:19:10Z"
}
Response Statuses for Processing a Sale
Cybersource
responds to your request with one of these statuses in
the status
field:- FAILED: The sale request is unsuccessful. A possible reason is invalid fields or missing fields in the request.
- PENDING: The sale request is successful and is currently processing. Send check status requests until the status updates.
With an active webhook subscription, you will receive real-time notifications when
the transaction status updates. For more information, see Create a Webhook Subscription.
If you do not receive a webhook notification, send check status requests until you
receive an updated status. For more information, see Check a Status.
Create a Webhook Subscription
Webhooks are automated notifications generated by system events that occur in your
organizations. You can create a webhook subscription and designate a URL to receive
notifications when a Tink transaction status updates. By setting up automatic webhook
notifications, you do not need to send check status requests to monitor a sale status.
IMPORTANT
This section only describes overview information about creating a
webhook subscription. You must complete additional set-up tasks that are not
described in this guide before you can create a webhook subscription. If you have
not set up your system to support webhooks, see the
Webhooks Implementation Guide for the REST
API
.Notifications that contain sensitive, personally identifiable information (PII), such as
account numbers, are sent using message-level encryption.
Transport Layer Security is required in order to ensure data integrity.
Endpoints
Send a POST request to one of these endpoints:
- Test:POSThttps://apitest.cybersource.com/notification-subscriptions/v2/webhooks
- Production:POSThttps://api.cybersource.com/notification-subscriptions/v2/webhooks
- India Production:POST https://api.in.cybersource.com/notification-subscriptions/v2/webhooks
Notification Statuses
Webhook subscriptions send these notification statuses:
- CANCELLED: The customer did not complete the checkout using the redirect URL.
- FAILED: The sale request failed.
- SETTLE_INITIATED: The customer completed checkout and Tink Pay by Bank is processing the sale.
- SETTLED: The sale is settled for the requested amount.
Test Your Webhook Requests
You can use the to send webhook
related test requests. See the Create a Webhook section in the
.
Cybersource
REST API ReferenceCybersource
REST API ReferenceRequired Fields for Creating a Webhook
Subscription
- description
- name
- organizationId
- products.eventTypes
- Set the value of this field topayments.payments.updated.
- products.productId
- Set the value of this field toalternativePaymentMethods.
- securityPolicy.securityType
- Set to one of these possible values:
- KEY: Mutual trust security type (default)
- oAuth: OAuth security type
- oAuth_JWT: OAuth with JWT security type
- webhookUrl
Required Fields for OAuth
Include these fields in addition to the above fields when using the OAuth security
policy.
- securityPolicy.config.oAuthTokenExpiry
- Set to365.
- securityPolicy.config.oAuthTokenType
- Set toBearer
- securityPolicy.config.oAuthURL
Required Fields for OAuth with JWT
Include these fields in addition to all of the above fields when using the OAuth with
JWT security policy.
- securityPolicy.config.additionalConfig.aud
- securityPolicy.config.additionalConfig.client_id
- securityPolicy.config.additionalConfig.keyId
- securityPolicy.config.additionalConfig.scope
Optional Fields for Webhook Subscriptions
- deactivateflag
- Required if thehealthCheckUrlfield is present.
- Set totrueto automatically activate the subscription.
- healthCheckUrl
- Set to the health check URL. Required to auto-activate the subscription. If you do not include this field, the created subscription is inactive. An inactive subscription does not send notifications.
- retryPolicy.deactivateFlag
- retryPolicy.firstRetry
- retryPolicy.interval
- retryPolicy.numberOfRetries
- retryPolicy.repeatSequenceCount
- retryPolicy.repeatSequenceWaitTime
Example: Creating a Webhook Subscription
Request
{
  "name": "My Custom Webhook",
  "description": "Sample Webhook from Developer Center",
  "organizationId": "<SET TO YOUR ORGANIZATION ID OR MERCHANT ID>",
  "products": [
    {
      "productId": "alternativePaymentMethods",
      "eventTypes": [
        "payments.payments.updated"
      ]
    }
  ],
  "webhookUrl": "https://MyWebhookServer.com:8443/simulateClient",
  "securityPolicy": {
    "securityType": "KEY"
  }
}
Response to a Successful Request
{
  "organizationId": "organizationId",
  "productId": "terminalManagement",
  "eventTypes": [
    "terminalManagement.assignment.update"
  ],
  "webhookId": "ddb9bced-c3e3-1b1d-e053-9c588e0a3c42",
  "name": "My Custom Webhook",
  "webhookUrl": "https://MyWebhookServer.com:443/simulateClient",
  "healthCheckUrl": "https://MyWebhookServer.com:443/simulateClientHealthCheck",
  "createdOn": "2022-04-28T15:39:56.928Z",
  "status": "ACTIVE",
  "description": "Sample Webhook from Developer Center",
  "retryPolicy": {
    "algorithm": "ARITHMETIC",
    "firstRetry": "1",
    "interval": "1",
    "numberOfRetries": "3",
    "deactivateFlag": "false",
    "repeatSequenceCount": '0",
    "repeatSequenceWaitTime": "0"
  },
  "securityPolicy": {
    "securityType": "KEY",
    "digitalSignatureEnabled": "yes"
  },
  "version": "3",
  "notificationScope": "SELF"
}
Check a Status
Send check status requests for a pending sale to know when the sale is settled. A settled
status verifies that the payment is complete. A check status request requires the sale
request ID from the sale response.
Endpoints
Production:
POST
https://api.cybersource.com
/pts/v2/refresh-payment-status/{id}
Test:
POST
https://apitest.cybersource.com
/pts/v2/refresh-payment-status/{id}
Set the to the sale request ID. The sale request ID is
the
{id}
id
field value in the sale response.Required Fields for Checking a Status
- Set totinkPayByBank.
- Set tobankTransfer.
- Set toAP_STATUS.
Optional Fields for Checking a Status
- Set to a unique value for your internal tracking purposes.
Example: Checking a Status
Request
{
    "clientReferenceInformation": {
        "code": "refnum-1234"
    },
    "paymentInformation": {
        "paymentType": {
            "method": {
                "name": "tinkPayByBank"
            },
            "name": "bankTransfer"
        }
    }
}
Response to a Successful Request
{
    "processorInformation": {
        "responseCode": "00001"
    },
    "clientReferenceInformation": {
        "code": "refnum-1234"
    },
    "reconciliationId": "KOVYTDIN81U4",
    "message": "Request was processed successfully.",
    "orderInformation": {
        "billTo": {
            "firstName": "John",
            "lastName": "Smith"
        }
    },
    "status": "PENDING",
    "id": "7537264982366836004805",
    "submitTimeUtc": "2025-07-28T18:14:58Z"
}
Response to an Unsuccessful Request
{
    "reason": "TAX_ERROR",
    "processorInformation": {
        "responseCode": "30600",
        "responseDetails": "Tax Error"
    },
    "reconciliationId": "failed30600",
    "message": "Processor is not able to complete the payment transaction due to tax errors.",
    "status": "FAILED",
    "id": "7471512734131234567890",
    "submitTimeUtc": "2022-06-15T18:07:11Z"
}
Response Statuses for Checking a Status
Cybersource
responds to your request with one of these statuses in
the status
field:- CANCELLED: The customer did not complete checkout using the redirect URL.
- FAILED: The sale request is unsuccessful. A possible reason is invalid fields or missing fields in the request.
- PENDING: The sale request is successful and is currently processing. Send check status requests until the status updates.
- SETTLE_INITIATED: The customer completed checkout and Tink Pay by Bank is processing the sale.
- SETTLED: The sale is complete. You can confirm the purchase with the customer.
Reference Information
This section contains helpful information for managing Tink Pay by Bank services.
Generating Reports Using the Business Center
Business Center
You can generate various types of reports for your financial and reconciliation data. For
more information about how to automate your reports, see the
Reporting Developer
Guide
. For more information about how to use your Business Center
account to generate reports, see the Reporting User
Guide
.The
Reporting User Guide
contains these relevant topics:- How and When Reports Are Generated
- Downloading Available Reports
- Subscribing to Standard Reports
Additional Resources
For additional information about how to use the
Business Center
and manage
reports, see these helpful resources.- Business CenterNavigation
- For an overview of the various resources available in theBusiness Center, see this YouTube video:
- Getting Started with theBusiness Center
- For a step-by-step demonstration of how to navigate in theBusiness Center, see this YouTube video:
- Managing Report Subscriptions
- For an overview of how to manage report subscriptions in the Downloadable Reports section in theBusiness Center, see this YouTube video:
- Downloading Reports
- For an overview of how to download available reports in the Reports section in theBusiness Center, see this YouTube video:
Enable Tink in the Business Center
Business Center
Follow these steps to enable the Tink payment service for your merchant account.
Before you can complete this task, your account must have permission to enable
alternative payment services.
- Log in to theBusiness Center:
- In the left navigation panel, click theAvailable Productsicon. The Available Products page appears.
- In the Alternative Payment Methods section, clickEnable.
- Check the box next to each alternative payment method you want to enable and configure. You can choose alternative payment methods from these categories:
- Bank Transfer
- Buy Now Pay Later (BNPL)
- Card Payment
- Direct Debit
- eWallet
- Gift Card
- Local Card
- Post Pay Reference
- QR
- ClickContinue. The Product Configuration page appears.
- Enter the required details for each alternative payment method you want to configure.ClickCopy to other sectionsto populate the information to any other alternative payment methods that you selected.IMPORTANTYou must selectI have read and agree to the Terms and Conditionsfor each alternative payment method you want to enable.
- ClickContinueto return to the Available Products page.
Configure the Transacting Organization and Products
Follow these steps to modify the transacting organization details, or to enable and
configure products for the transacting organization:
- ClickStartin the Transacting Organization and Products section. The Transacting Organization and Products page is displayed.
- Optional: modify the name and ID of the organization by using the text fields in the Transacting Organization Details section. By default, the name is the merchant name with 001 added to the end of the name. If you accept this default, additional transacting organizations will have default names that iterate the numbers at the end of their names, beginning with 002.
- Optional: to edit the organization information, ClickEditin the Transacting Organization Information section. After editing, clickApply.
- To enable a product in the Product Enablement section, click the Enablement drop-down menu and selectEnabled.
- To modify the configuration, click theEditorconfigurebutton (depending on the product). Some products are not configurable.
- To confirm the configuration, clickApply.
- To save all product configurations, clickSave. You are returned to the Add Merchant page.
- To continue working with this organization, clickContinue working with this merchant. To finish and return to Merchant Management, clickReturn to merchant management.
Webhook Health Check URL and Automatic Revalidation
When you create a webhook subscription,
Cybersource
recommends that you include
a health check URL in the request. Including a health check URL enables Cybersource
to monitor your server's status for reliability. When Cybersource
detects that your health check URL is unresponsive, notification
deliveries are withheld until your health check URL becomes responsive again. A health
check URL ensures that you do not miss any notifications.To add a health check URL to your
create a subscription
request, include the healthCheckurl
field and set it to your health check URL.
You must also include the deactivateflag
field and
set it to true
to enable Cybersource
to withhold
notifications for periods when your server becomes unresponsive.Automatic Activation
After you successfully create or update a subscription,
Cybersource
pings your
health check URL within 5—10 minutes. If Cybersource
receives a
response, the subscription status automatically becomes ACTIVE
and
notifications are delivered. When Cybersource
does not receive a
response, your subscription status remains SUSPENDED
until Cybersource
receives a response. If you did not include a health check
URL when you created the subscription, Cybersource
pings your
webhook URL for automatic activation instead. You can also activate a subscription
that is not automatically activated by sending a PUT request. For more information,
see Activate a Webhook Subscription.Figure:
Webhook Automatic Activation

Automatic Revalidation
After the subscription's initial activation,
Cybersource
continues to monitor
your server status. If Cybersource
detects that your server is
unavailable, your subscription status automatically updates to
SUSPENDED
, and notifications are withheld. When Cybersource
detects that your server is available again, your
subscription status automatically updates to ACTIVE
, and all
withheld notifications are delivered.Add Merchant Account Information
Follow these steps to add merchant account information:
- In Basic Information, enter the merchant account name and the organization ID in the provided text fields.
ADDITIONAL INFORMATION
- The merchant account name is the name of the business.
- The organization ID is the name or identifier of the account that you are creating. It must be unique, not just in the portfolio or account, but in the system.
- Enter the merchant information in the provided text fields. Required fields are noted with an asterisk (*).
- ClickSave. You are returned to the Add Merchant page. You can skip the optional hierarchy step by clickingSkip.
Set Up the Transacting Organization and Products
The transacting organization is the entity that processes transactions. Follow these
steps to create a transacting organization and configure products for it:
- ClickStartin the Transacting Organization and Products section. The Transacting Organization and Products page is displayed.
- Optional: modify the name and ID of the organization by using the text fields in the Transacting Organization Details section. The ID must be unique, not just in the portfolio or account, but across the system. By default, the name is the merchant name with 001 added to the end of the name. If you accept this default, additional transacting organizations will have default names that iterate the numbers at the end of their names, beginning with 002.
- Optional: By default, the organization information is inherited from the parent organization. To edit the organization information, clickEditin the Transacting Organization Information section. After editing, clickApply.
- To enable a product in the Product Enablement section, click the Enablement drop-down menu and selectEnabled.
- To modify the configuration, click theEditorConfigurebutton (depending on the product). Some products are not configurable.
- To confirm the configuration, clickApply.
- To save all product configurations, clickSave. You are returned to the Add Merchant page.
- To continue working with this organization, clickContinue working with this merchant. To finish and return to Merchant Management or to add another merchant, clickReturn to merchant management.
ADDITIONAL INFORMATION
The image below shows the Transacting Organization and Products page.Figure:
Transacting Organization and Products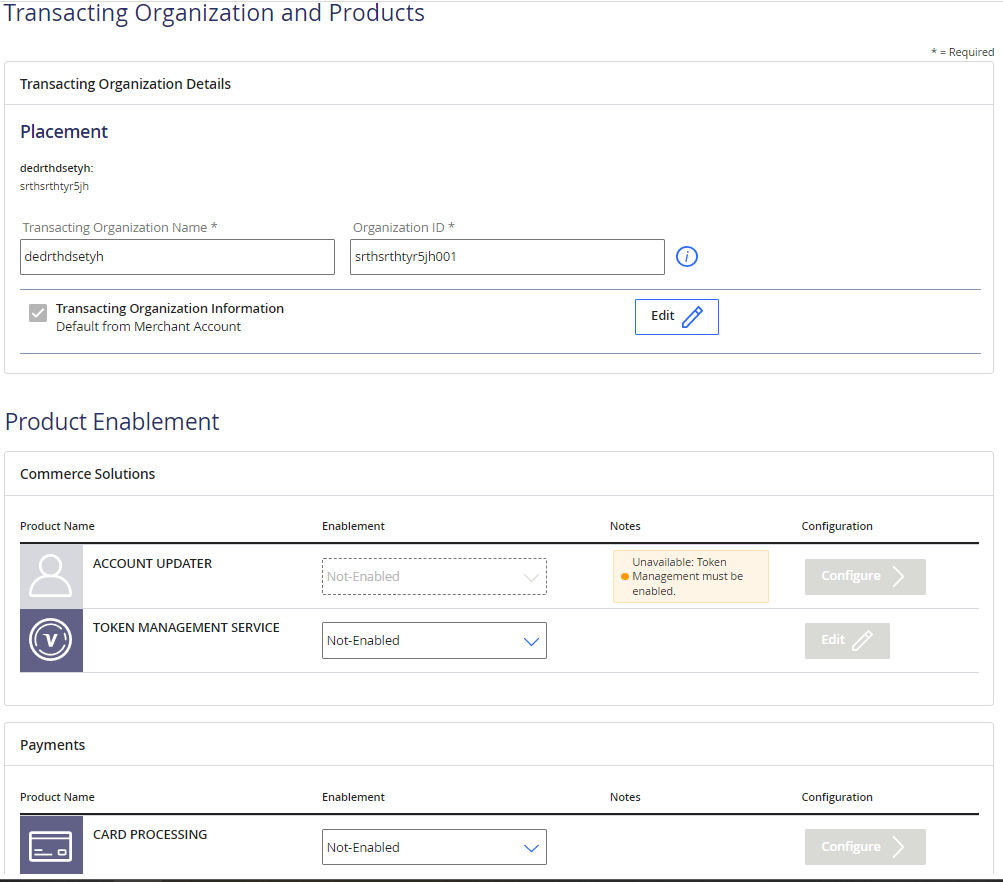
Configure the Retry Policy
If your webhook URL or health check URL are unresponsive,
Cybersource
resends
the webhook notifications according to the subscription's retry policy
. All
subscriptions are created with a default retry policy. You can configure the default
retry policy when you create a subscription or update the webhook subscription.To configure a subscription's retry policy, include these required fields in the
create a
subscription
request or an update a subscription
request: - retryPolicy.deactivateFlag
- Set to one of these possible values:
- false: Notifications arenotwithheld when your webhook URL or health check URL are unresponsive. This is the default value.
- true: Notifications are withheld when your webhook URL or health check URL are unresponsive, and the subscription status updates toSUSPENDED. When the URLs become responsive again, the withheld notifications are sent and the subscription status updates toACTIVE.
- retryPolicy.firstRetry
- The number of minutes before the notification is resent. The default value is1.
- retryPolicy.interval
- The number of minutes between each retry attempt. The default value is1.
- retryPolicy.numberOfRetries
- The number of retry attempts. The default value is3.
- retryPolicy.repeatSequenceCount
- The number of times to repeat the retry sequence. The default value is0.
- retryPolicy.repeatSequenceWaitTime
- The number of minutes between each repeat sequence. The default value is0.
Manage Webhook Subscriptions Requests
This section describes how to manage your webhook subscriptions using the REST API. These
follow-on requests require the webhook subscription ID.
After you set up a webhook subscription, you can manage your subscription using these
requests:
- Retrieve the details of a subscription
- Retrieve a list of subscriptions by product and event
- Update a subscription
- Delete a subscription
- Verify a subscription's configuration
- Activate a subscription
- Deactivate a subscription
Activate a Webhook Subscription
This section describes how to activate a webhook subscription.
This request requires the webhook subscription ID. The subscription ID is in the
webhookId
response field from the create a webhook
subscription
request.Endpoints
Send a PUT request to one of these endpoints. The
is the webhook subscription ID.
{webhookId}
- Test:PUTapitest.cybersource.com/notification-subscriptions/v2/webhooks/{webhookId}/status
- Production:PUTapi.cybersource.com/notification-subscriptions/v2/webhooks/{webhookId}/status
- India Production:PUT https://api.in.cybersource.com/notification-subscriptions/v2/webhooks/{webhookId}/status