offers PayTo Pay by Bank, a payment method that enables your
e-commerce customers to pay directly from their bank accounts. When using PayTo, your
customers do not need to enter their card information. After you integrate PayTo into
your checkout experience, your customers select the
Pay by Bank
option. This
checkout option enables your customers to choose their bank from a list of trusted
partner banks to authorize the payment. After payment approval, the funds transfer from
your customer's account to your merchant account. This payment method is an
account-to-account (A2A) transfer.
Benefits of Using PayTo Pay by Bank
PayTo provides these benefits for e-commerce payments:
Immediately transfers funds from the customer's account to your merchant bank
account.
Reduces the amount of customer data you store.
Using a customer's bank authentication network to securely process
payments.
Avoids card processing fees.
Supported Country and Currency
PayTo is available in Australia and supports payments using the Australian dollar
(AUD).
Supported Services
Sale, refund, and check status services are available with PayTo Pay by Bank. For
more information, see these sections:
This workflow illustrates a successful payment using PayTo Pay by Bank.
Figure:
Processing a Payment
The customer begins to check out on your website and chooses the PayTo Pay by
Bank payment option. This option enables the customer to choose their bank from
a list of available partner banks.
status,
sale request ID, and the PayTo redirect URL.
You redirect the customer to the PayTo URL.
The customer uses their bank account or PayID to approve the payment and is
redirected to your website.
Cybersource
sends you an automatic SETTLED or FUNDED webhook
notification when the sale is complete. For more information, see Introduction to Webhooks.
If you do not receive a webhook notification or have not enabled webhook
notifications, you send periodic check status requests with the sale request ID
to
Cybersource
until you receive an updated status. For more
information, see Check a Status.
Cybersource
responds to your check status request with a SETTLED
or FUNDED status. This status confirms that the payment is complete.
You confirm the payment.
Refund Workflow
This workflow describes the sequence of events that comprises a successful PayTo Pay
by Bank refund.
Figure:
Issuing a Refund Workflow
Figure:
The customer returns the purchase to the merchant.
The merchant sends a refund API request to
Cybersource
with the
request ID from the successful capture. For more information, see Refund a Payment.
Cybersource
responds to the merchant with the
PENDING
status and a refund request ID.
The merchant sends periodic check status API requests to
Cybersource
until the status updates. For more information, see Check a Status.
Cybersource
responds to the merchant with the
REFUNDED
status when the refund is processed.
The merchant displays a refund confirmation to the customer.
Check Transaction Status Workflow
This workflow describes the sequence of possible statuses you can receive when
processing a PayTo Pay by Bank transaction.
Figure:
Transaction Statuses Workflow
The merchant sends a check status API request to
Cybersource
to
verify the status of the sale and receives one of these statuses:
FAILED
: The sale request failed. A failed request can be
due to either Pay by Bank rejecting the transaction or due to a technical
error.
FUNDED
: The sale request is funded for the requested
amount.
PENDING
: The sale request is accepted but is not complete.
Request the check status service to retrieve status updates.
SETTLED
: The sale request is settled for the requested
amount.
The merchant sends a check status API request to
Cybersource
to
verify the refund status and receives one of these statuses:
FAILED
: The refund request failed. A failed request can be
due to PayTo Pay by Bank rejecting the transaction or due to a technical
error.
PENDING
: The sale request is accepted but is not complete.
Request the check status service to retrieve status updates.
REFUNDED
: The settled amount is successfully refunded.
Transaction Processing
This section describes how to process transactions using the
REST API
.
Process a Sale
This section describes how to send a sale request to process a payment.
A sale request authorizes and captures a payment in the same request. A successful sale
response includes a redirect URL and a
PENDING
status. Redirect the
customer to the PayTo URL to allow the customer to complete the checkout using their
bank information. When the customer completes the checkout, the customer is redirected
to your website.
When you receive a successful response, save the sale request ID in the
id
response field to perform a follow-on check status
request or refund request.
Calculating the Grand Total
Include the grand total in the request by using the
orderInformation.amountDetails.totalAmount
field.
Endpoints
Production:
POST
https://api.cybersource.com
/pts/v2/payments
Test:
POST
https://apitest.cybersource.com
/pts/v2/payments
Processing a Sale
Processing a sale requires you to use information from the API
response message to redirect the customer to a website where the customer can complete
the checkout. Follow these steps to process a sale.
Request a check status to retrieve the current status of a transaction request. The check status request is helpful when know when a pending status updates. The check status request requires the request ID from the response of the corresponding request you are attempting to retrieve.
Endpoints
Production:
POST
https://api.cybersource.com
/pts/v2/payments
Test:
POST
https://apitest.cybersource.com
/pts/v2/payments
Response Statuses
If you send a check status request to retrieve the current sale status, these are the
possible responses:
FAILED
: The sale request failed. A failed request can be
due to either Pay by Bank rejecting the transaction or due to a technical
error.
FUNDED
: The sale request is funded for the requested
amount.
PENDING
: The sale request is accepted but is not complete.
Request the check status service to retrieve status updates.
SETTLED
: The sale request is settled for the requested
amount.
If you send a check status request to retrieve the current refund status, these are the
possible responses:
FAILED
: The refund request failed. A failed request can be
due to PayTo Pay by Bank rejecting the transaction or due to a technical
error.
PENDING
: The sale request is accepted but is not complete.
Request the check status service to retrieve status updates.
Webhooks are automated notifications generated by system events that occur in your
organizations. You can create a webhook subscription and designate a URL to receive
notifications when a sale status updates. By setting up automatic webhook notifications,
you do not need to send check status requests to monitor a sale status.
Webhook notifications are only sent when a sale status changes.
IMPORTANT
This section only describes overview information about creating a
webhook subscription. You must complete additional set-up tasks that are not
described in this guide before you can create a webhook subscription. If you have
not set up your system to support webhooks, see the
Set to the health check URL. Required to auto-activate the subscription.
If you do not include this field, the created subscription is inactive.
An inactive subscription does not send notifications.
Follow these steps to configure alternative payment methods
in
the
Business Center
:
In the left navigation panel, click the
Available
Products
icon. The Available Products page appears.
In the Alternative Payment Methods section, click
Enable
.
Check the box next to each alternative payment method you want to enable and
configure. You can choose alternative payment methods from these
categories:
Bank Transfer
Buy Now Pay Later (BNPL)
Card Payment
Direct Debit
eWallet
Gift Card
Local Card
Post Pay Reference
QR
Click
Continue
. The Product Configuration page
appears.
Enter the required details for each alternative payment method you want to
configure.
Click
Copy to other sections
to populate the
information to any other alternative payment methods that you selected.
IMPORTANT
You must select
I have read and agree to
the Terms and Conditions
for each alternative payment
method you want to enable.
Click
Continue
to return to the Available Products
page.
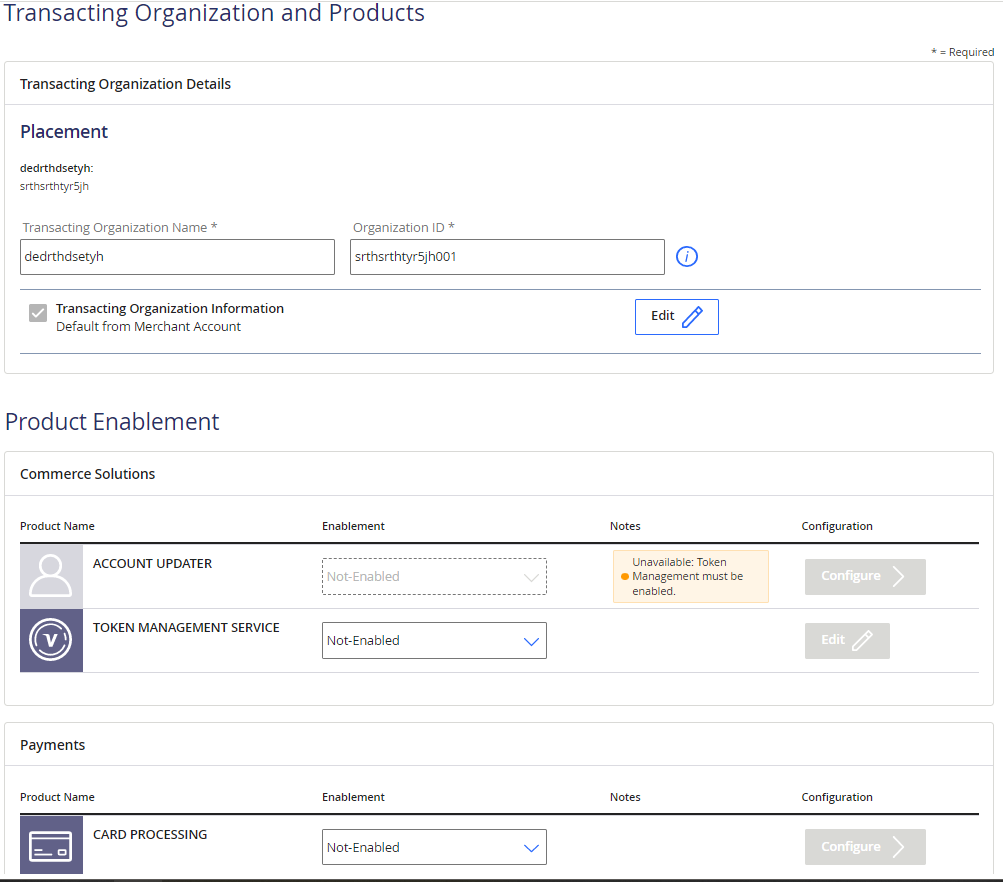
Configure the Transacting Organization and Products
Follow these steps to modify the transacting organization details, or to enable and
configure products for the transacting organization:
Click
Start
in the Transacting Organization and Products
section. The Transacting Organization and Products page is displayed.
Optional: modify the name and ID of the organization by using the text fields in the
Transacting Organization Details section. By default, the name is the merchant name with
001 added to the end of the name. If you accept this default, additional transacting
organizations will have default names that iterate the numbers at the end of their names,
beginning with 002.
Optional: to edit the organization information, Click
Edit
in
the Transacting Organization Information section. After editing, click
Apply
.
To enable a product in the Product Enablement section, click the Enablement drop-down
menu and select
Enabled
.
To modify the configuration, click the
Edit
or
configure
button (depending on the product). Some products are
not configurable.
To confirm the configuration, click
Apply
.
To save all product configurations, click
Save
. You are returned
to the Add Merchant page.
To continue working with this organization, click
Continue working with this
merchant
. To finish and return to Merchant Management, click
Return to merchant management
.
Webhook Subscriptions
Webhooks are automated notifications generated by system events that occur in your
organization. You can enroll in a sale or refund event and designate a URL to receive
notifications when the event updates. You set up your webhook subscriptions only
once.
Notifications that contain sensitive, personally identifiable information such as account
numbers are sent using message-level encryption.
Transport Layer Security is required in order to ensure data integrity.
Endpoints
Production
:
https://api.cybersource.com
/notification-subscriptions/v2/webhooks
Test
:
https://apitest.cybersource.com
/notification-subscriptions/v1/webhooks
Notification Statuses
Webhook subscriptions send these status notifications:
ABANDONED
: The customer did not complete the transaction.
CANCELLED
: The customer did not complete the checkout using the
redirect URL.
COMPLETED
: The transaction is complete.
FAILED
: The payment failed.
PENDING
: The payment was initiated.
REFUNDED
: The settled amount is successfully refunded.
SETTLED
: The sale request is settled for the requested
amount.
Additional Requirements
Webhooks Implementation Guide
There are additional requirements for implementing webhooks
that are not discussed in this guide. For more information, see the
To create an alternative payment notification webhook, see the Create a Webhook section in
the
Cybersource
REST API Reference
.
Webhook Health Check URL and Automatic Revalidation
When you create a webhook subscription,
Cybersource
recommends that you include
a health check URL in the request. Including a health check URL enables
Cybersource
to monitor your server's status for reliability. When
Cybersource
detects that your health check URL is unresponsive, notification
deliveries are withheld until your health check URL becomes responsive again. A health
check URL ensures that you do not miss any notifications.
To add a health check URL to your
create a subscription
request, include the
healthCheckurl
field and set it to your health check URL.
You must also include the
deactivateflag
field and
set it to
true
to enable
Cybersource
to withhold
notifications for periods when your server becomes unresponsive.
Automatic Activation
After you successfully create or update a subscription,
Cybersource
pings your
health check URL within 5—10 minutes. If
Cybersource
receives a
response, the subscription status automatically becomes
ACTIVE
and
notifications are delivered. When
Cybersource
does not receive a
response, your subscription status remains
SUSPENDED
until
Cybersource
receives a response. If you did not include a health check
URL when you created the subscription,
Cybersource
pings your
webhook URL for automatic activation instead. You can also activate a subscription
that is not automatically activated by sending a PUT request. For more information,
see Activate a Webhook Subscription.
Figure:
Webhook Automatic Activation
Automatic Revalidation
After the subscription's initial activation,
Cybersource
continues to monitor
your server status. If
Cybersource
detects that your server is
unavailable, your subscription status automatically updates to
SUSPENDED
, and notifications are withheld. When
Cybersource
detects that your server is available again, your
subscription status automatically updates to
ACTIVE
, and all
withheld notifications are delivered.
Reason Codes and Pay by Bank Response Codes
This table describes some of the reason codes and Pay by Bank response codes that you
receive when you request a Pay by Bank service. Use the values listed in the table
to determine the transaction result.
For additional reason codes and descriptions, see the
One or more fields in the request contain invalid data.
150
20000
: Failed status
20001
: Failed status
20002
: Failed status
Possible reasons:
The signature was not included in the HTTP header.
The signature in the HTTP header has expired, or it is
not a valid signature.
203
30000
: Failed status
30100
: Failed status
30200
: Failed status
30400
: Failed status
30500
: Failed status
Pay by Bank declined the transaction because of funding
source problems, or the transaction was flagged as high risk.
204
30350
: Failed status
Payment declined because of insufficient funds in the
account.
233
30600
: Failed status
30700
: Failed status
Pay by Bank declined the transaction because of tax errors or
government compliance errors.
Add Merchant Account Information
Follow these steps to add merchant account information:
In Basic Information, enter the merchant account name and the organization ID in the
provided text fields.
ADDITIONAL INFORMATION
The merchant account name is the name of the business.
The organization ID is the name or identifier of the account that you are creating.
It must be unique, not just in the portfolio or account, but in the system.
Enter the merchant information in the provided text fields. Required fields are noted
with an asterisk (*).
Click
Save
. You are returned to the Add Merchant page. You can
skip the optional hierarchy step by clicking
Skip
.
Set Up the Transacting Organization and Products
The transacting organization is the entity that processes transactions. Follow these
steps to create a transacting organization and configure products for it:
Click
Start
in the Transacting Organization and Products
section. The Transacting Organization and Products page is displayed.
Optional: modify the name and ID of the organization by using the text fields in the
Transacting Organization Details section. The ID must be unique, not just in the portfolio
or account, but across the system. By default, the name is the merchant name with 001
added to the end of the name. If you accept this default, additional transacting
organizations will have default names that iterate the numbers at the end of their names,
beginning with 002.
Optional: By default, the organization information is inherited from the parent
organization. To edit the organization information, click
Edit
in
the Transacting Organization Information section. After editing, click
Apply
.
To enable a product in the Product Enablement section, click the Enablement drop-down
menu and select
Enabled
.
To modify the configuration, click the
Edit
or
Configure
button (depending on the product). Some products are
not configurable.
To confirm the configuration, click
Apply
.
To save all product configurations, click
Save
. You are returned
to the Add Merchant page.
To continue working with this organization, click
Continue working with this
merchant
. To finish and return to Merchant Management or to add another
merchant, click
Return to merchant management
.
ADDITIONAL INFORMATION
The image below shows the Transacting Organization and Products page.
Figure:
Transacting Organization and Products
Configure the Retry Policy
If your webhook URL or health check URL are unresponsive,
Cybersource
resends
the webhook notifications according to the subscription's
retry policy
. All
subscriptions are created with a default retry policy. You can configure the default
retry policy when you create a subscription or update the webhook subscription.
To configure a subscription's retry policy, include these required fields in the
create a
subscription
request or an
update a subscription
request:
retryPolicy.deactivateFlag
Set to one of these possible values:
false
: Notifications are
not
withheld when your webhook URL or
health check URL are unresponsive. This is the default value.
true
: Notifications are withheld when your webhook URL
or health check URL are unresponsive, and the subscription status
updates to
SUSPENDED
. When the URLs become responsive
again, the withheld notifications are sent and the subscription status
updates to
ACTIVE
.
retryPolicy.firstRetry
The number of minutes before the notification is resent. The default value is
1
.
retryPolicy.interval
The number of minutes between each retry attempt. The default value is
1
.
retryPolicy.numberOfRetries
The number of retry attempts. The default value is
3
.
retryPolicy.repeatSequenceCount
The number of times to repeat the retry sequence. The default value is
0
.
retryPolicy.repeatSequenceWaitTime
The number of minutes between each repeat sequence. The default value is
0
.
Check Status
Send a check status request to retrieve status updates for either a pending sale or
refund. A check status request requires the request ID from the sale response or the
refund response, which is the
id
field value.
Cybersource
recommends
using the check status service only when you do not receive a webhook notification. To
set up a webhook subscription, see Webhook Subscriptions.
Endpoints
Production:
POST
https://api.cybersource.com
/pts/v2/refresh-payment-status/
{id}
Test:
POST
https://apitest.cybersource.com
/pts/v2/refresh-payment-status/
{id}
Set the
{id}
to the request ID of the API service you are retrieving.
Response Statuses
Cybersource
responds to your check sale status request with one of
these statuses in the
status
field:
Check Status for a Sale
ABANDONED
: The customer did not complete
checkout within the allotted time, and the redirect URL has
expired.
COMPLETED
: The customer completed the checkout
process.
PENDING
: The sale request is accepted but is
not complete. Request the check status service to retrieve
status updates.
REJECT
: The sale request failed. A failed
request can be due to either Pay by Bank rejecting the
transaction or due to a technical error.
SETTLED
: The sale request is settled for the
requested amount.
Check Status for a Refund
PENDING
: The refund request is accepted but is
not complete. Request the check status service to retrieve
status updates.
REFUNDED
: The settled amount is successfully
refunded.
REJECT
: The refund request failed. A failed
request can be due to either Pay by Bank rejecting the
transaction or due to a technical error.
The check status service also responds with a reason code in the