Skip to login Skip to content
Developer Cybersource Logo

Getting started

Find tailored resources to kickstart your integration

API Reference

Use our live console to test and start building with our APIs


Accept payments

Online or In-person payment acceptance made easy

Technology partners

Register to get onboard our sandbox environment as a Tech partner or explore our pre-built integrations

Resources

Create seamless scalable payment experiences with interactive tools and detailed documentation

Documentation hub

Explore developer guides and best practices for integration with our platform

SDKs

Get pre-built samples to build or customize your integrations to fit your business needs

Demo hub

Access to variety of our product demos 

Testing

Signup for sandbox and use testing resources before going live

Sandbox signup

Create a sandbox to test our APIs


Testing guide

Guide with sandbox testing instructions and processor specific testing trigger data

Response codes

Understand all different error codes that REST API responds with

Support

Find resources and guidance to build, test, and deploy on our platform

Frequently asked questions

Find answers to commonly-asked questions about our APIs and platform

Contact us

Connect with our team of experts to troubleshoot or go-live to Production

Developer community

Connect and share with community of developers 


AI Assistant

Menu
API Overview
  • eCheck Merchant Guide
    • Recent Revisions to This Document
  • Introduction to the eCheck Service
    • Requirements for Using the eCheck Service
    • eCheck Transaction Types
  • Getting Started with the eCheck Service
    • eCheck Application
      • Submitting the eCheck Application
      • Completing eCheck Application Fields
    • Boarding Your Merchant Account for Sandbox Testing
  • Overview of eCheck Transaction Processing
    • eCheck Settlement
      • eCheck Returns
      • eCheck Chargebacks
      • eCheck Credits and Refunds
    • eCheck Transaction Statuses During Processing
    • eCheck Integrations
    • eCheck Risk Reserve
    • eCheck Processing Limits and Settings
    • eCheck Notice of Change
    • Payment Authorization and Authentication for eCheck Transactions
    • eCheck Records Retention Requirements
  • Manage eCheck Settings in the Business Center
    • Managing Merchant Permissions in the Business Center
      • Creating Roles
      • Creating a User Account and Adding Roles
    • Accessing eCheck Settings in the Business Center
      • eCheck Statements
        • eCheck Settlement Account Statements
        • eCheck Reserve Account Statements
  • Process eCheck Transactions Using the Business Center
    • Submitting Transactions Using the Virtual Terminal
      • Configuring the Virtual Terminal to Process eCheck Transactions
      • Processing eCheck Transactions Using the Virtual Terminal
    • Submitting Transactions Using Recurring Billing and Token Management Service
      • Creating an eCheck Recurring Subscription
      • Requesting an On-Demand Transaction
    • eCheck Transaction Search and Details
  • Process eCheck Transactions Using the REST API
    • Processing an eCheck Debit Transaction Using the REST API
      • Required Fields for an eCheck Debit Transaction
      • Optional Fields for an eCheck Debit Transaction
      • REST Example: eCheck Debit Transaction
    • Processing a Recurring eCheck Debit Transaction Using the REST API
      • Required Fields for a Recurring eCheck Debit Transaction
      • REST Example: Recurring eCheck Debit Transaction
    • Creating an eCheck Token Using the REST API
      • Required Fields for Creating an eCheck Token
      • REST Example: Creating an eCheck Token
    • Creating an eCheck Token and Processing an eCheck Transaction Using the REST API
      • Required Fields for Creating an eCheck Token and Processing an eCheck Transaction
      • Optional Fields for Creating an eCheck Token and Processing an eCheck Transaction
      • REST Example: Creating an eCheck Token and Processing an eCheck Transaction
    • Using an eCheck Token to Submit an eCheck Debit Transaction Using the REST API
      • Required Fields for Using an eCheck Token to Submit an eCheck Debit Transaction
      • Optional Fields for Using an eCheck Token to Submit an eCheck Debit Transaction
      • REST Example: Using an eCheck Token to Submit an eCheck Debit Transaction
  • Accepting eCheck Payments through Unified Checkout, Pay by Link, and Invoicing
    • Accepting eCheck Payments through Unified Checkout
    • Accepting eCheck Payments through Invoices
    • Accepting eCheck Payments through Payment Links
  • eCheck Reconciliation Reports
    • Funding Details Report
      • Fields in the Funding Details Report
    • Chargeback Details Report
      • Fields in the Chargeback Details Report
    • Deposit Details Report
      • Deposit Details Report Line Items
      • Fields in the Deposit Details Report
  • eCheck Reconciliation Reporting Case Study
    • Day 1
    • Day 2
    • Day 3
    • Day 4
    • Day 5
    • Day 6
    • Day 7
    • Day 8
On This Page

Accepting eCheck Payments through Payment Links

Pay by Link provides payment links for selling products or receiving donations online. The links can be set at a fixed price or be configured so that the customer specifies the payment value. These links can be distributed to multiple customers.
If the eCheck payment method is enabled for your account, it appears as
Pay with Bank Account
on the checkout after the merchant proceeds via the payment link.
You can create and manage payment links through the
Business Center
or directly integrate Pay by Link APIs into your own system to automate the creation and management of payment links. For more information on integrating with Pay by Link, see the
Pay by Link Developer Guide
.
Your customers will follow this workflow to use the payment link.
  1. eCheck appears as
    Pay with Bank Account
    on the checkout after proceeding via the link.

    ADDITIONAL INFORMATION

    Figure:

    Payment Link on the Webpage
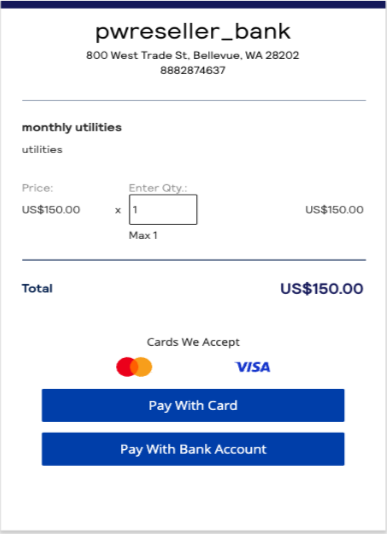
  2. When the customer clicks
    Pay with Bank Account
    , a sidebar appears. In the sidebar, the customer enters information about their bank account and billing address and clicks
    Continue
    .

    ADDITIONAL INFORMATION

    Figure:

    Bank Account Information and Billing Information
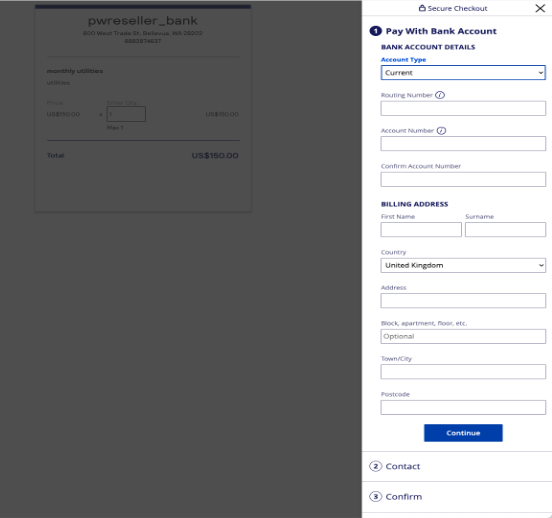
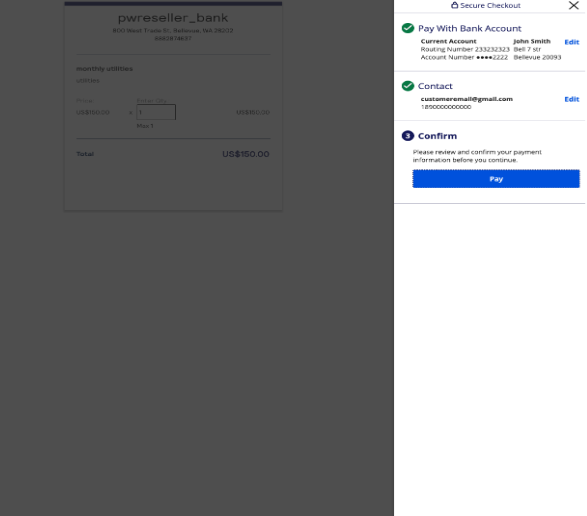
  3. In the Contact section, the customer enters their email address and phone number and clicks
    Continue
    .
  4. In the Confirm section, the customer reviews the information they provided. If necesssary, the customer can click
    Edit
    to make changes to any of the information. If the information is correct, the customer clicks
    Pay
    to make the payment.

    ADDITIONAL INFORMATION

    Figure:

    Review the Information and Click Pay
Previous topic
Next topic
Back to top

Visa

Cybersource.com

Terms + conditions

Cookie policy

Privacy notice

Your privacy rights

© 2024 Cybersource. All rights reserved. All brand names and logos are the property of their respective owners, are used for identification purposes only, and do not imply product endorsement or affiliation with Cybersource.